Tag Archives: Review

IBG Models 1/72 Crusader Mk. III (72068) In-Box Review and History

I have only tried one other IBG kit to date, the A9 Cruiser Tank MK I, part of their World at War series, and it wasn’t bad at all. It came with tracks and running gear moulded as a single part for each side, and the only disappointment on that kit was that the tracks were completely lacking in detail. Some kits from this Polish manufacturer have a reputation for being extremely difficult to build – they offer several versions of the British Universal Carrier for example, and I believe that these include link-and-length tracks. Attempting link and length tracks on a 1/72 Universal Carrier sounds like quite a challenge, so I haven’t been tempted by those.

This kit was released in 2019 and I know that, like the A9, it includes tracks that are moulded as a single part per side along with the inner parts of the roadwheels, sprockets and idlers. That can be a good way to create tracks for small-scale armour, but it can also lead to simplification of both tracks and running gear. If you’re a regular reader, you’ll know that poor tracks have marred many armour kits for me. Will these be any good? We’ll take a peek inside the box soon, but first, let’s talk briefly about the Crusader Mk III.  

History

When it entered service in late 1940, the Crusader was by far the best British Cruiser Tank to date. However, given that most of the preceding cruisers had been dismally bad, that wasn’t a high bar to achieve – its immediate predecessor, the visually similar Cruiser Tank Mk V Covenanter, had such catastrophic overheating problems that it was never used in combat despite a pressing need for tanks in North Africa.

A pair of Crusader MK Is in North Africa, recognisable by the auxiliary machine gun-turret on the right side of the front hull.

The Crusader, or to give it its full and rather cumbersome title, the A15 Cruiser Tank Mk. VI Crusader, entered service too late to see combat in France and its initial deployment was as part of the 7th Armoured Division in North Africa. The first Crusaders to arrive in North Africa took part in Operation Battleaxe,  a British offensive intended to break the siege of Tobruk. That operation wasn’t a success and, when facing the panzers of the Afrika Korps, the new Crusaders proved to be too lightly armed (with the same QF 2-Pdr main gun that had been mounted in all previous British Cruisers) and too lightly armoured, with just 40mm of frontal armour.

A Crusader Mk. II in North Africa. No auxiliary front machine gun turret and additional armour, but still armed with the QF 2-Pdr main gun.

That led to the Crusader Mk II, with improved frontal armour (increased to 49mm) and with the auxiliary machine gun turret on the front hull removed. That was an improvement, but only marginally and it wouldn’t be until late 1942 that the subject of this kit, the Crusader Mk. III, armed with a more powerful 6-Pdr main gun, finally began to arrive in North Africa.

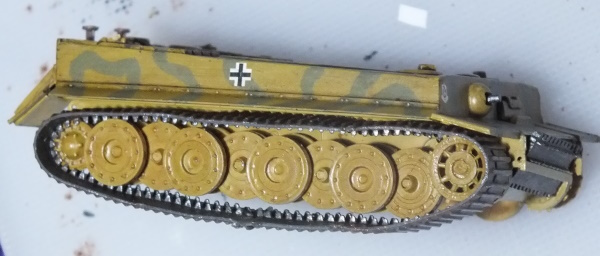
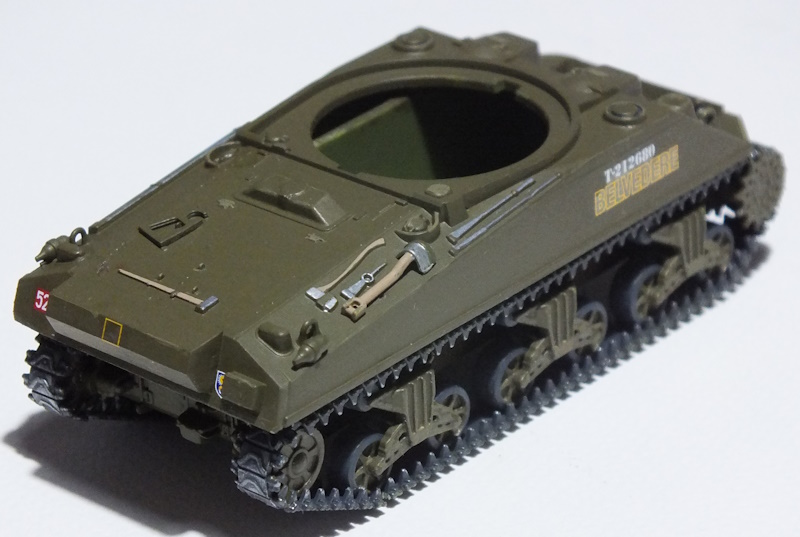
A Crusader Mk. III with 6-Pdr main gun in North Africa. This is one of the tanks for which decals and a suggested colour scheme are provided with this kit.

The 6-Pdr main gun was certainly an improvement, but the size of the breech meant that there was space in the turret for just two crew, the commander and gunner (a loader had been included in the Mk I and II). Crusader Mk. IIIs were used in combat in North Africa and Tunisia up to their final engagement at the Battle of Wadi Akarit in Tunisia in April 1943. By that time, British tank units were re-equipping with the M4 Sherman and after that, the Crusader was used mainly in the UK for training and home defence.   

A Crusader Mk. III in Tunisia, late 1942. The Tunisian campaign was the last time that the Crusader was used in combat.

The Crusader was better than previous British Cruiser tanks, but it was far from perfect. The Mk. III with the 6-Pdr gun was an improvement in terms of firepower, but losing the loader led to a reduction in rate of fire. All Crusaders suffered from reliability problems, particularly in the heat and dust of North Africa and Tunisia. Its engine was the Nuffield Liberty L12, a complex and fragile derivation of a 1917 aero-engine design – more than half of all Crusaders lost During Operation Battleaxe were sidelined due to mechanical  breakdowns. Some people claim that the Crusader, and particularly the up-gunned Mk III, was the best mid-war British tank. Personally, I feel that “least worst” might be a better description…

What’s in the Box?

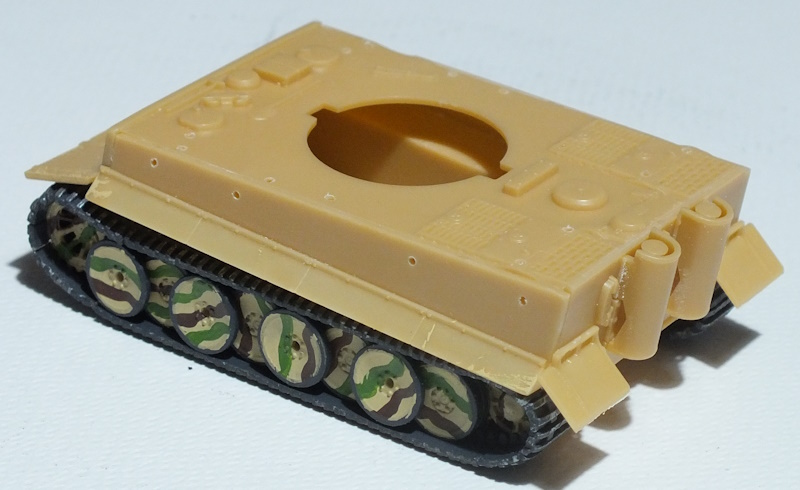
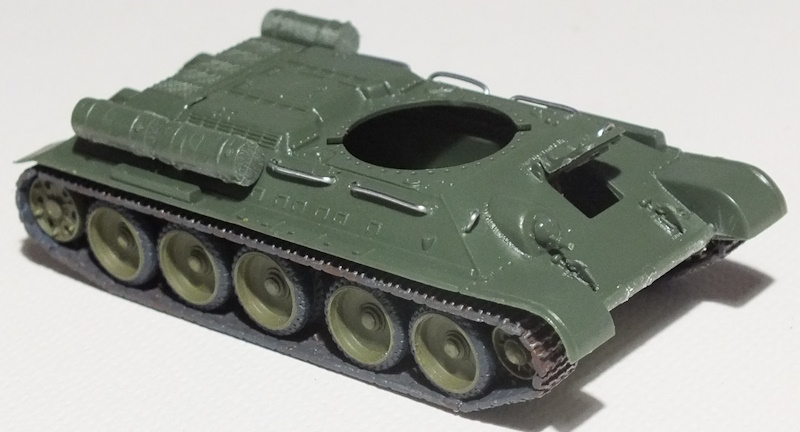
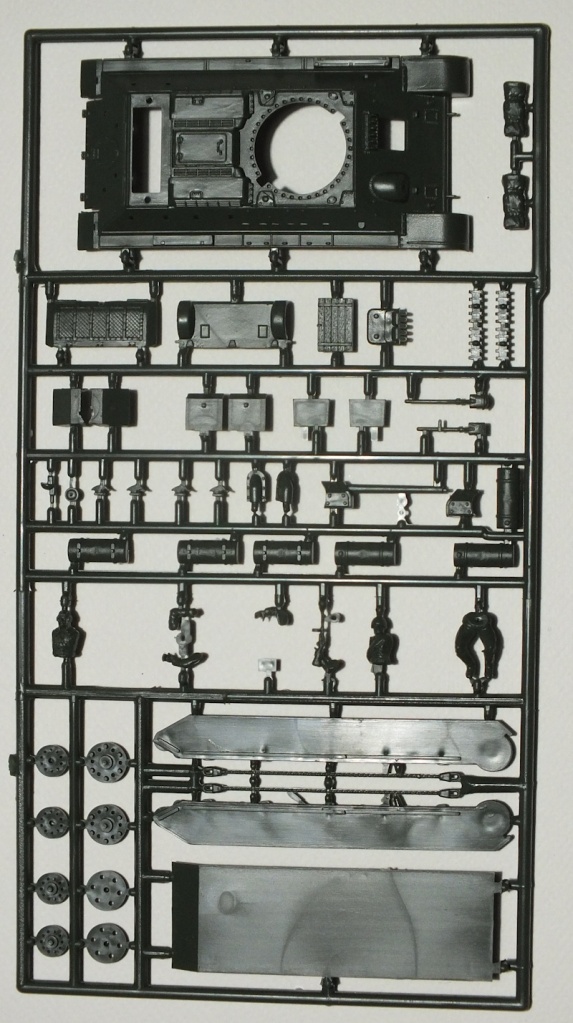
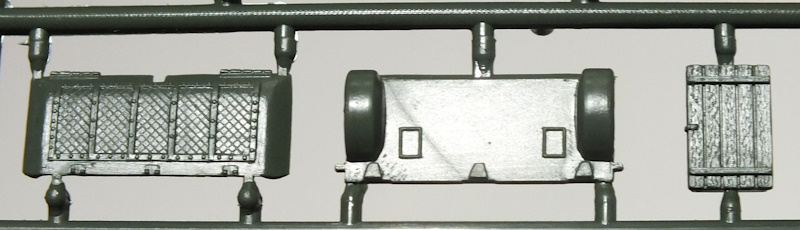
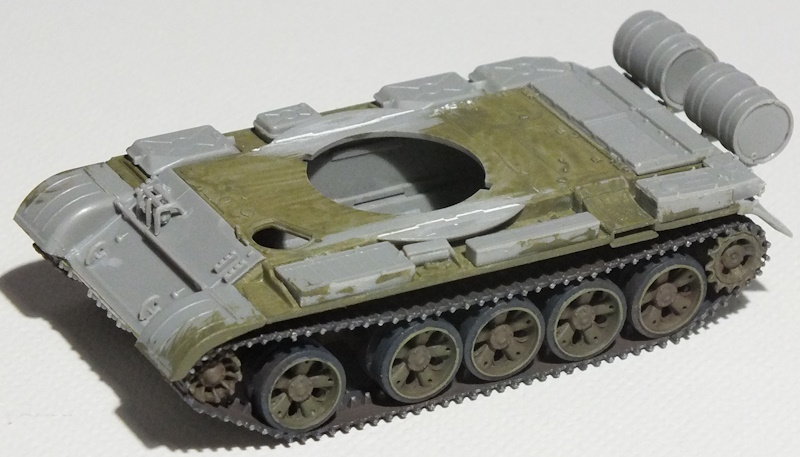
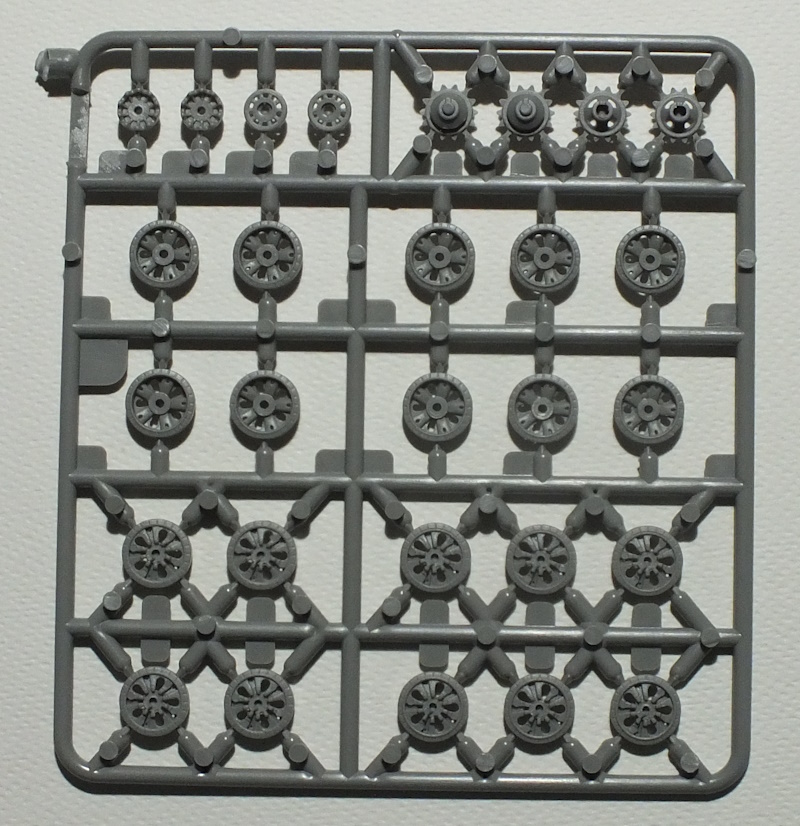
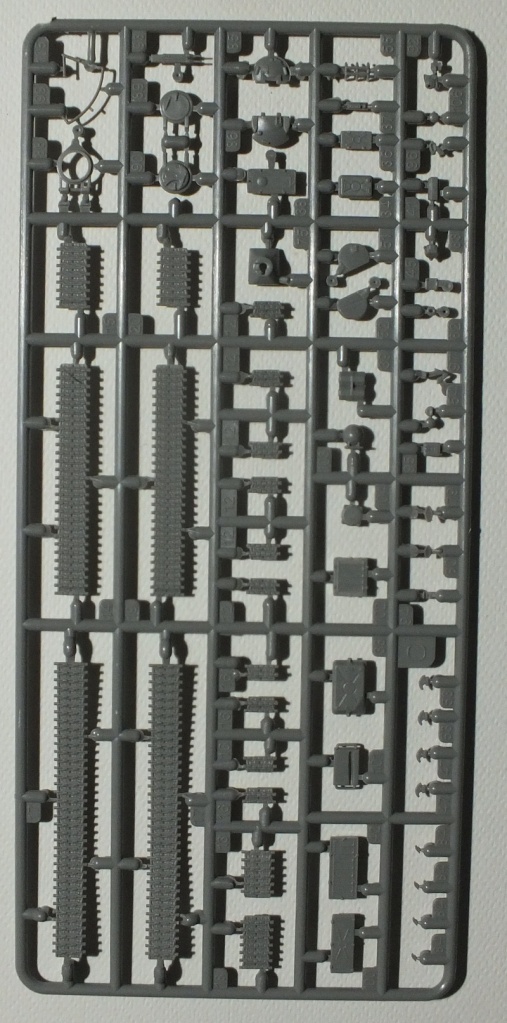
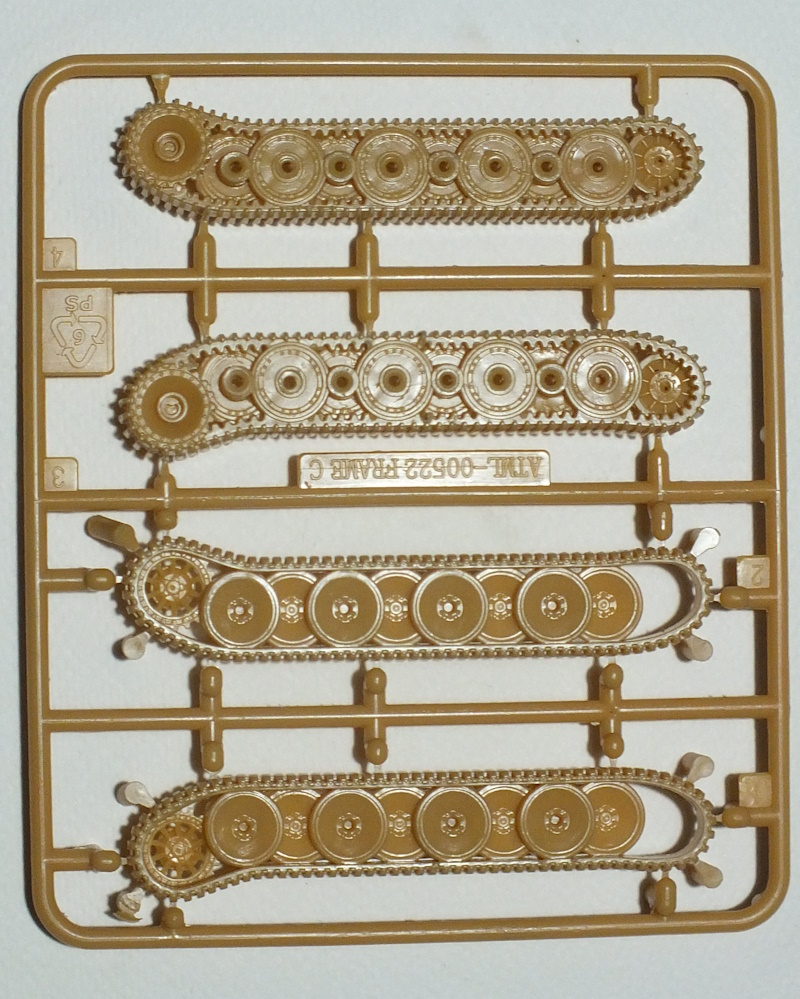
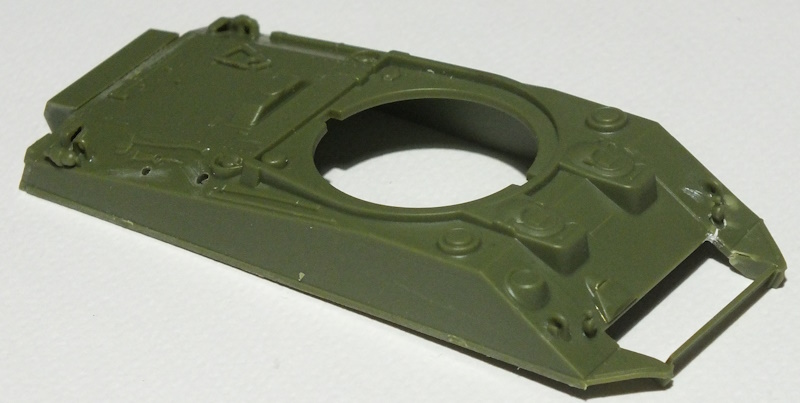
Inside the large, top-opening box you’ll find 9 small sprues moulded in grey plastic (two identical sprues provide the outer roadwheels, sprockets and idlers), the two track/running gear mouldings, decals, instructions and a PE fret that includes the side-skirts.

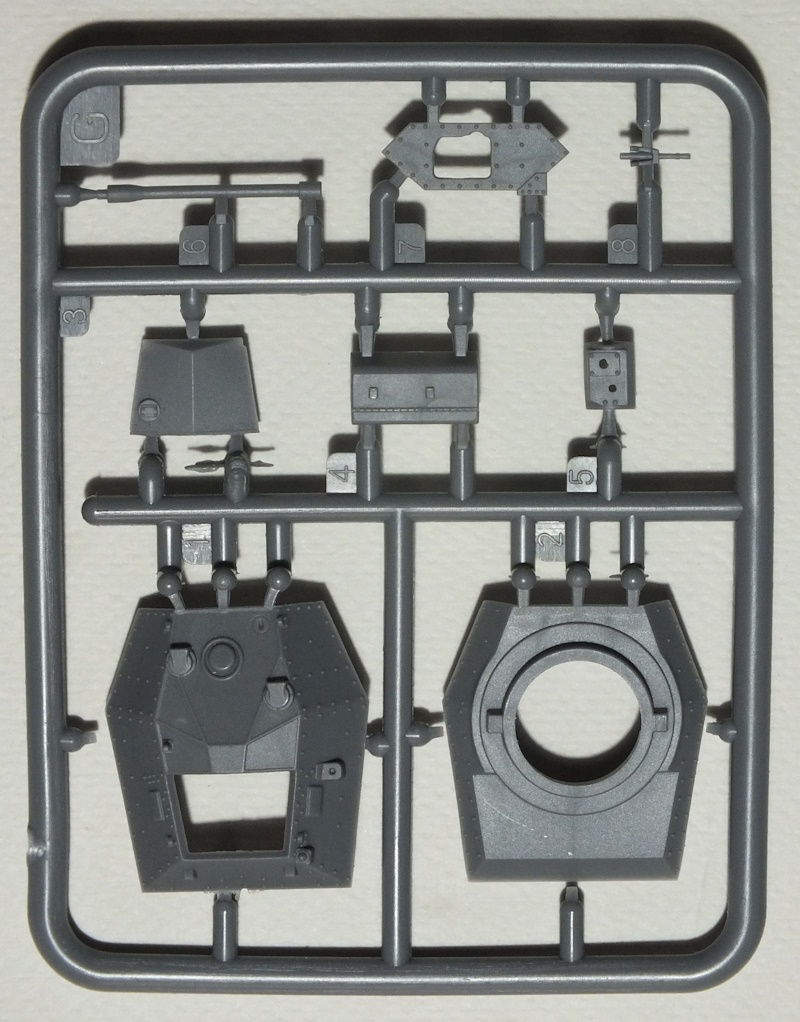
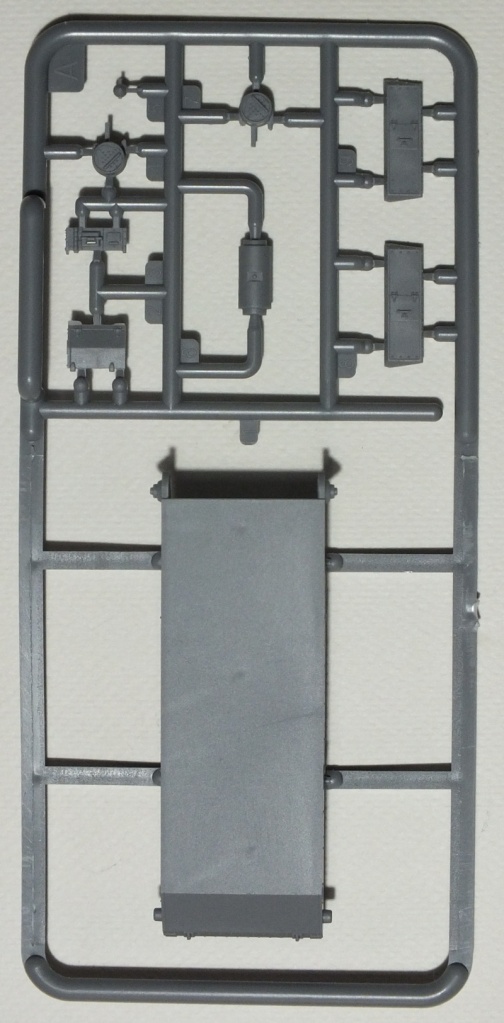
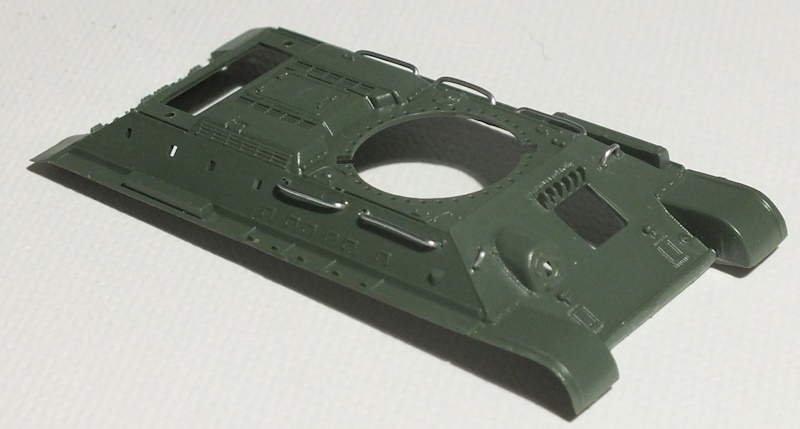
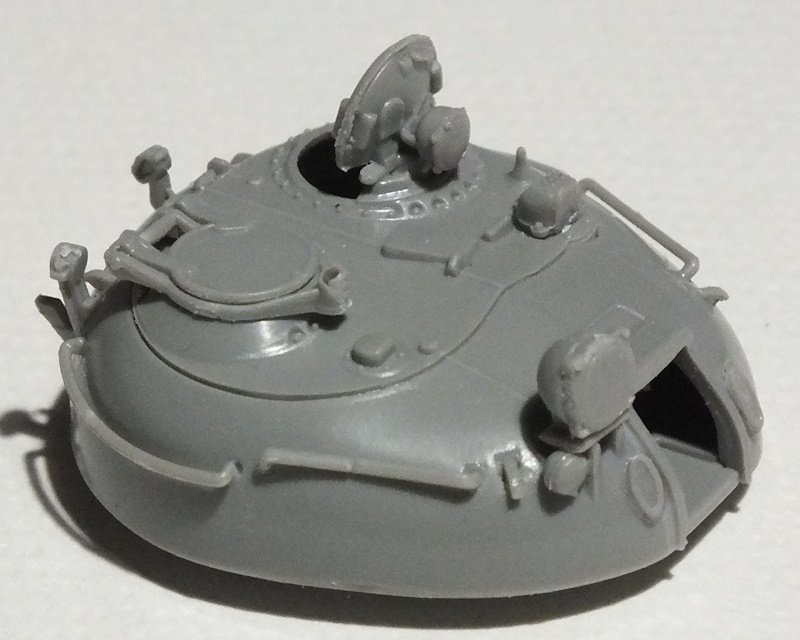
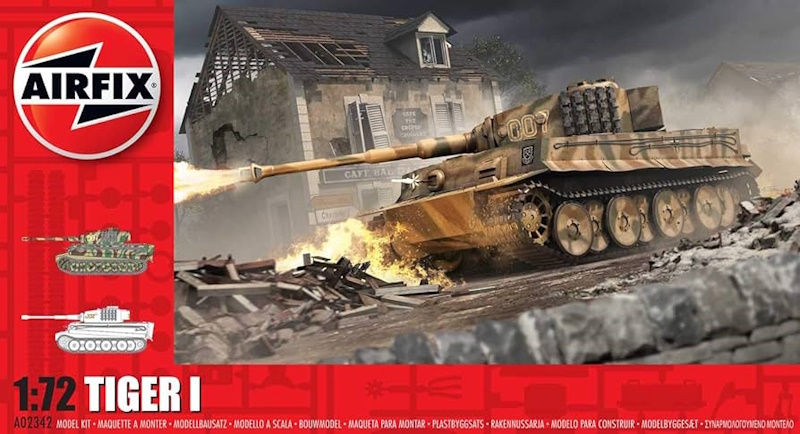
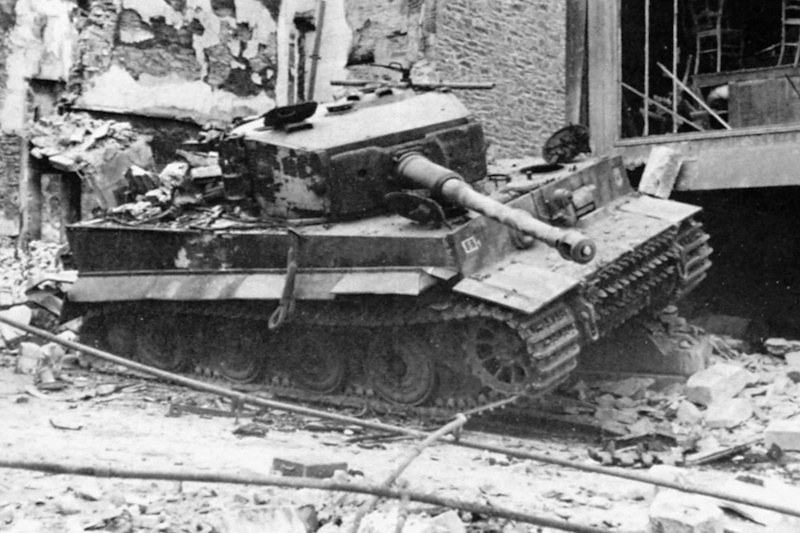
I was recently disappointed by the new AIrfix 1/72 Tiger kit, partly because the surface detail was so soft. Here, I’m delighted to report that the mouldings and detail look sharp enough to shave with.

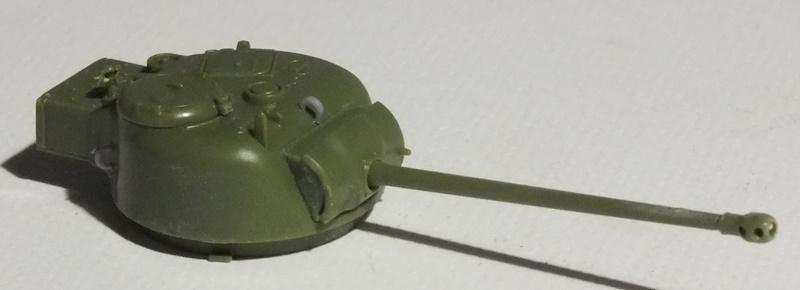
Everywhere you look you’ll see really sharply moulded detail and what’s provided seems appropriate for the Mk III Crusader.

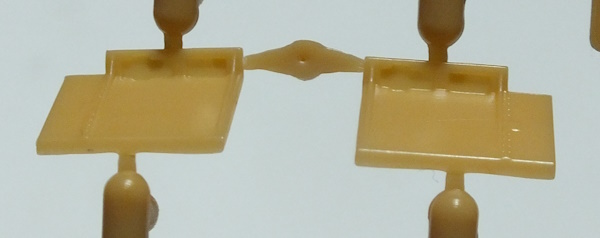
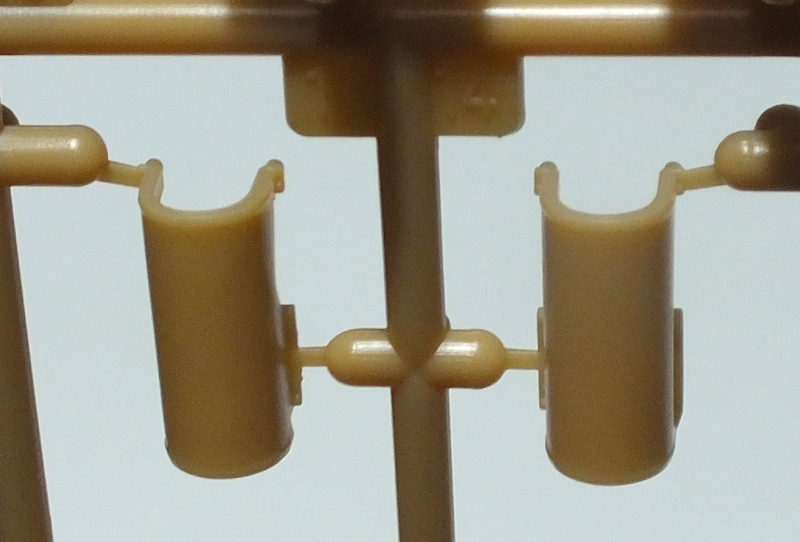
Even some very small parts are very nicely detailed indeed (the front of the driver’s armoured box is shown below) though no slide moulding is used here so you will need to drill out the main gun .

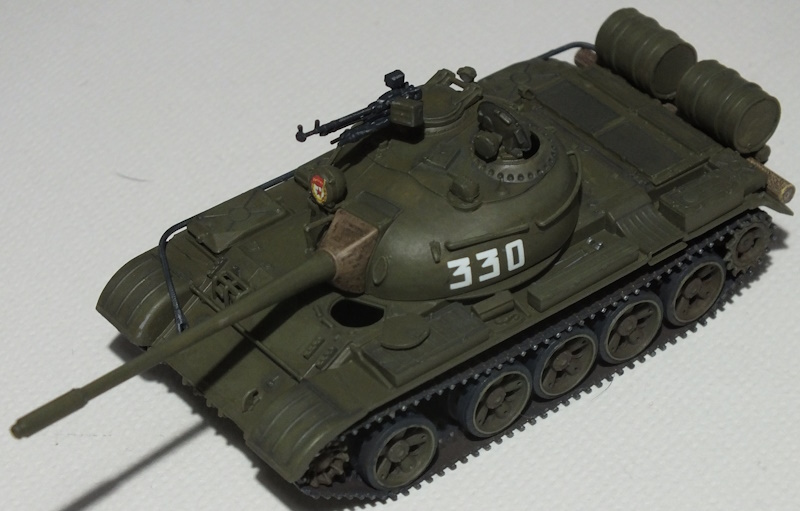
Two alternate versions of the track-guards are provided: one set for use with the supplied PE side-skirts and one if you want to show this model without side-skirts. None of the hull or turret hatches can be shown open and no tools or stowage items are included.

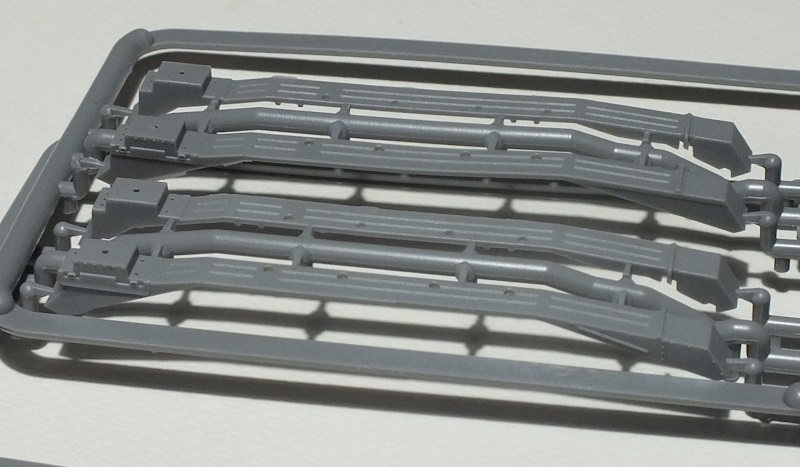
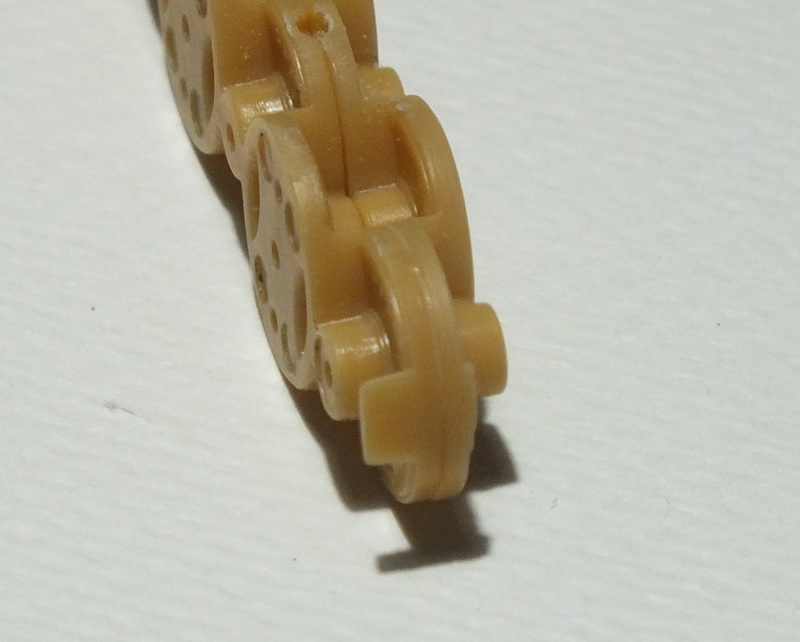
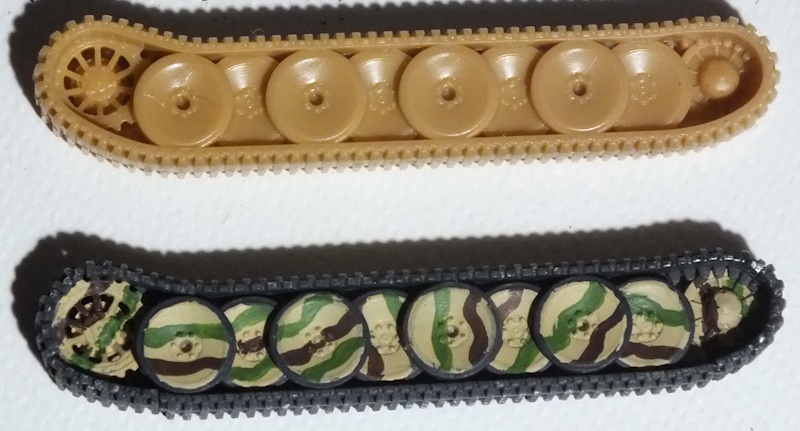
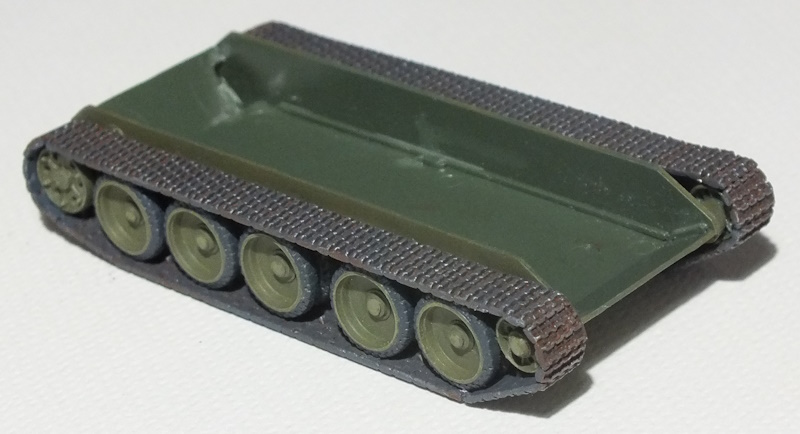
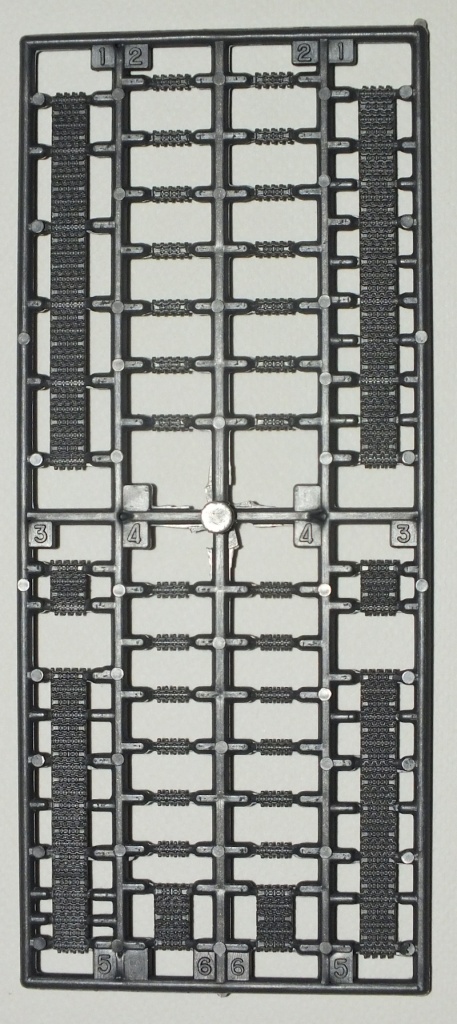
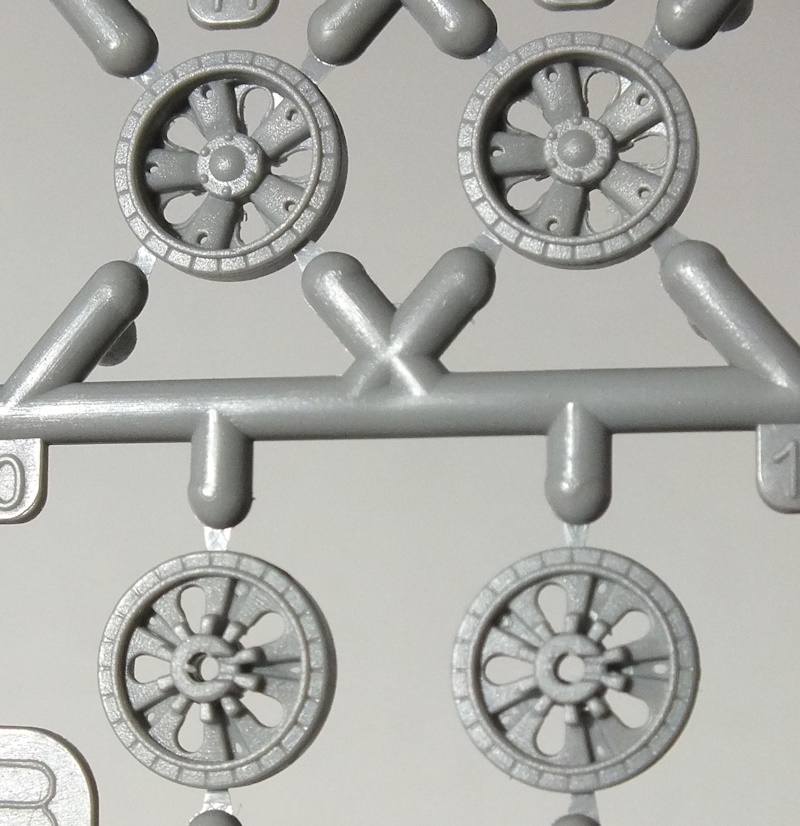
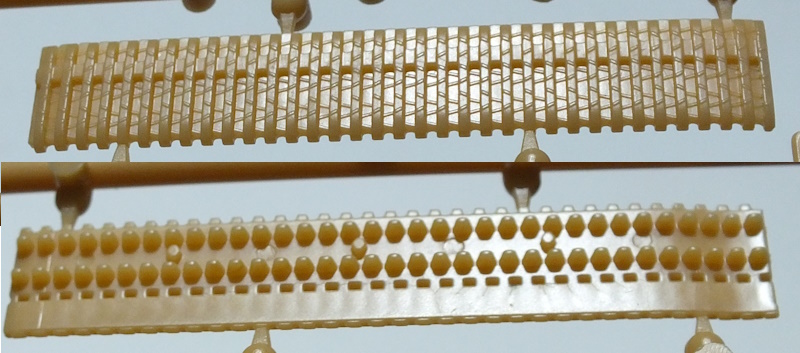
What about the tracks? Well, hold your breath folks, because these are amongst the best small-scale armour tracks that I have yet seen! OK, the inner roadwheels and in the inner halves of the sprockets and idlers are moulded as a single part integral with the tracks, but that doesn’t seem to have compromised detail at all.

On the outside, these are even better. The tracks on the Crusader were narrow and featured small links, and I really didn’t expect to see much detail here given that they are so tiny (you’ll see the tracks next to a match in the image below to give and idea of just how small they are). Instead, the links and tread detail are beautifully rendered and look accurate. Top marks to IBG for these tracks alone! 

The PE fret makes me a little nervous. I think I can deal with the tiny headlight protectors, but a thin section along the top edge of the side skirts has to be bent at 90˚ and that looks as though it might be very tricky to do accurately. I might begin the build on this kit by attempting to bend the PE side-skirts to see how they look. It they don’t turn out well, I’ll model this as a Crusader in the UK without side skirts.

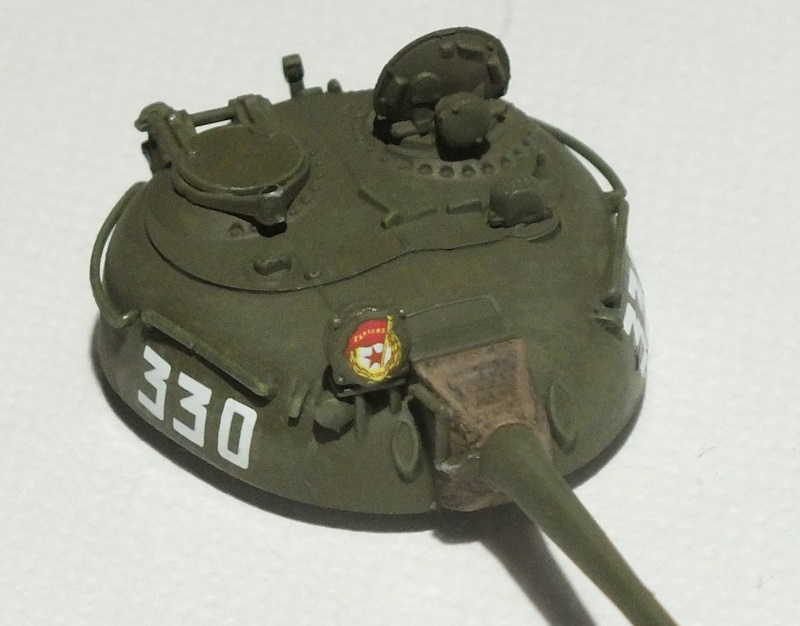
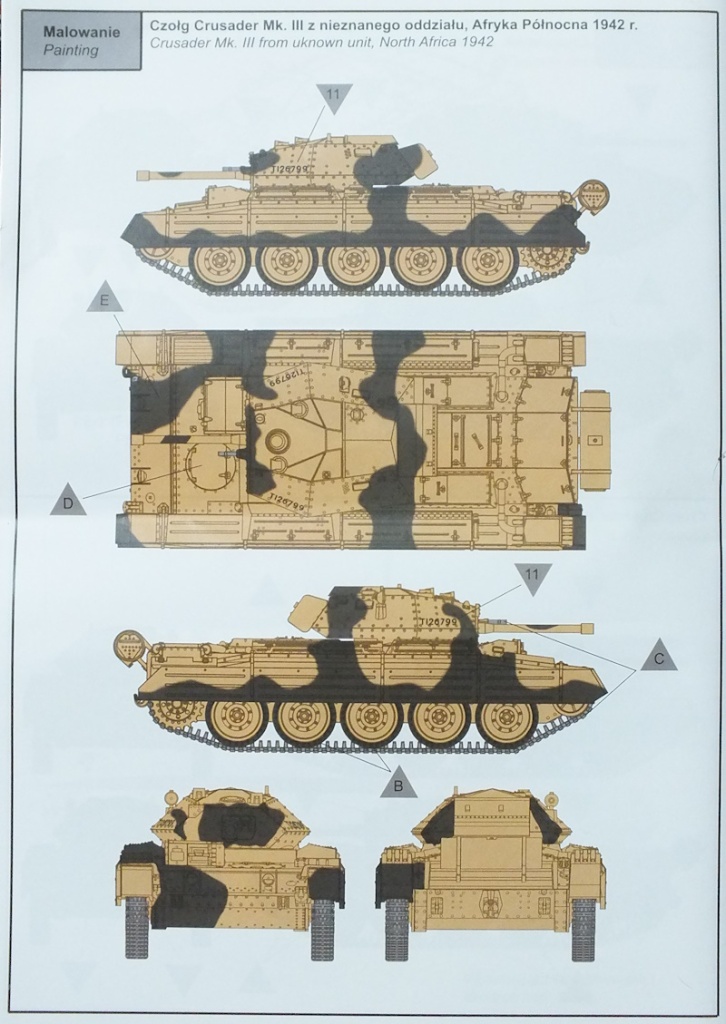
Decals are provided for three tanks, one used in North Africa in 1942 by an unknown unit, one used by a Polish unit in the UK in 1942 and one for a tank of the 6thArmoured Division in Tunisia in 1943.

Two colour schemes are suggested: two in overall Olive Drab for tanks used in the UK and Tunisia in 1942 and 1943 and one from an unknown unit in North Africa in 1942 with a base of Light Stone and a disruptive camo scheme in Dark Brown. If you want to build this kit without side skirts, only the scheme and decals for a Polish unit in the UK in 1942 are appropriate.  

Would You Want One?

Looking at this in the box, the answer would seem to be an unequivocal: Yes! The mouldings are delightfully sharp, detail looks good and I can’t see anything here that doesn’t look accurate. The tiny  tracks in particular look really outstanding and fairly simple to work with and the overall level of details looks very good indeed. I won’t know about fit until I begin the build of this kit, but what I see in the box looks very promising indeed.

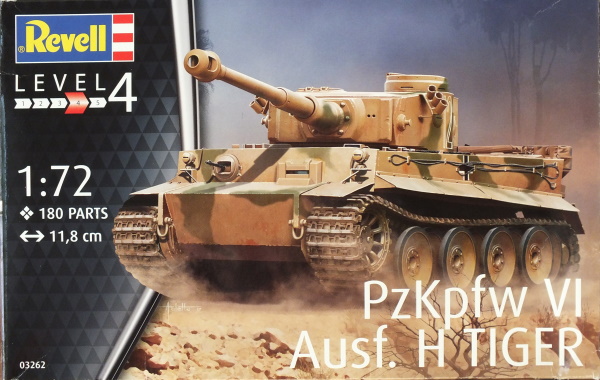
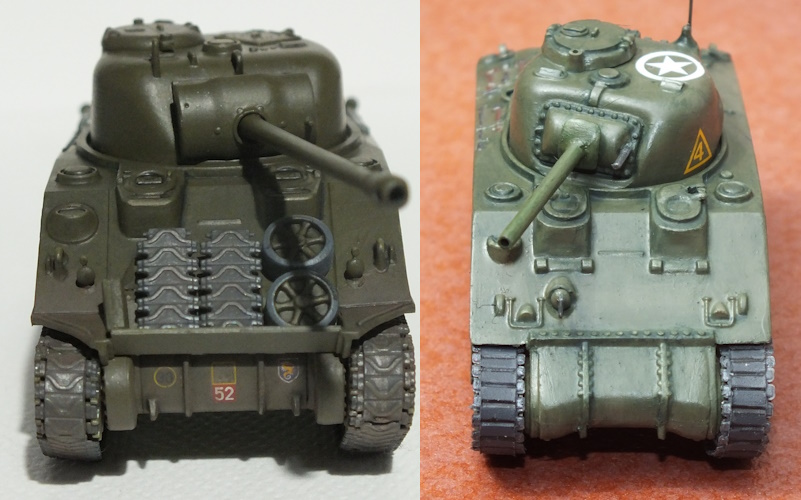
If you don’t fancy this one, then I’m afraid that your choices of Crusader Mk III in 1/72 are very limited indeed – why is it that are so few kits of British tanks of World War Two, I wonder? The Hasegawa Crusader MK III dates from all the way back in 1975 and it isn’t bad in terms of detail, though the mouldings are not as crisp and detailed as those in the IBG version and feature some visible ejector marks. This kit comes with rather thick vinyl tracks and the Revell 1/72 Crusader Mk III released in 2001 is simply a re-box of this kit. One thing missing from the Hasegawa/Revell kits are the side skirts, and these do seem to have been fitted to all Crusaders used in North Africa and Tunisia, and it’s for those theatres that decals are and colours schemes are provided. You’ll either have to ignore this or build your own side-skirts.

As far as I know, the only other small scale option is the Airfix 1/76 Crusader Tank (but it’s really a MK III), released back in 1971. I don’t think that this kit has never been re-released as part of the Vintage Classics series, and I’m afraid that it isn’t great even if you can find one. The hull is too narrow, detailing is pretty clumsy and the rubber-band style tracks are much too thick and rather nasty. If you do want to build a small-scale Crusader Mk III, this IBG appears to be the only recent option, so it’s fortunate that it looks like a pretty decent little kit.

Related Posts

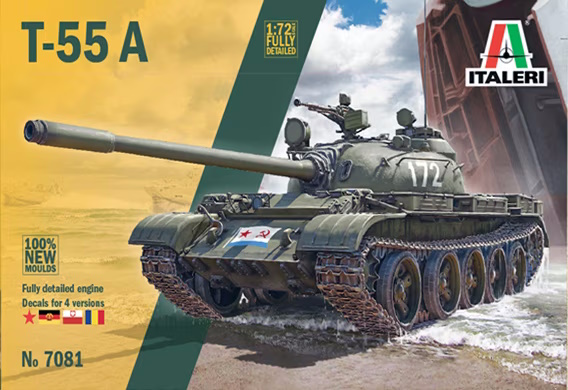
IBG Models 1/72 Crusader Mk. III (72068) Build Review – coming soon

IBG Models 1/72 A9 British Cruiser Tank Mk.I with 2 pdr Gun (WAW011) In-Box Review and History

Airfix 1/72 Tiger I (A02342) In-Box Review and History

Airfix 1/72 Tiger I (A02342) Build Review

I cannot tell a lie: I have been putting off this build. This kit has so many basic accuracy problems that are obvious as soon as you open the box that I seriously considered not bothering. But I’m not by nature a giver-upper, so it’s time to grit my teeth and see how the Airfix 1/72 Tiger builds up.

I had considered trying to correct some of the main accuracy problems, but that’s not easy and you’ll still end up with a kit with soft detail. So instead, I’m going to build this straight out of the box. I start with construction of the lower hull. Fit is OK, though there are some minor gaps and four obvious ejector marks on each hull side, though I believe that these will be completely hidden by the tracks and roadwheels.

I add the upper hull and sides, after drilling out 16, 1mm holes. Why? These aren’t holes for optional parts, they need to be there. So why not just include them in the mould? Airfix advertising suggests that this kit may be suitable for a beginner, but I’d guess that many beginners won’t have access to a 1mm drill and as you need to drill out no fewer than 30 holes here in total (14 are required in the turret) , that could be a major problem.

Construction of the tracks and running gear is a little different here. I’m going for the link and length track option, and these are constructed by building the roadwheels (two blocks of 8 roadwheels plus 8 single wheels per side), idlers and sprockets as modules, adding the tracks and then fixing these completed units to the hull. The inner and outer blocks of roadwheels also mount the idlers and sprockets. The idlers fit between the two blocks of roadwheels and the sprockets fit to two tabs at the front – the image below from the instructions shows the assembly and the two tabs to which the sprocket is attached, arrowed.

The problem is, two of the four sprocket mounting tabs are missing here. This looks like a moulding issue and on both inner roadwheel assemblies, the tab is missing. In the image below, you can see that on the outer assembly (to the right) the tab is present, but on the inner assembly on the left, there is just a small blob of plastic, arrowed.

I hope it will be possible to work around this, and it’s probably a measure of just how good modern injection moulding methods are that this is one of the few occasions where I have come across a problem with a kit that appears to have been caused by plastic failing to completely fill the mould.  You can see what I mean on the completed roadwheel assembly below.

This isn’t the end of the world by any means, but it is surprising on a kit first released just a couple of years ago. I get both assemblies done, temporarily placing them on the hull to make sure that the sprockets and idlers line up correctly. The attachment of the sprockets is a little fragile due to the missing tabs, but I’m hoping that won’t matter too much.

I’ll be painting the outer single roadwheels and tyres before I put them in place, so next, I check the tracks. And there are problems here too. Most notably, on the three double links that are intended to go over the idlers on each side. The pitch between the guide horns is a little too narrow to fit over the idlers. I assume that a little sanding should sort this out (which will also be needed where the larger runs touch the idlers) but it seems odd – these parts just don’t fit, and you’d imagine that someone at Airfix at some point of the development of this kit might have noticed this…

I paint the running gear and add the tracks and, apart from the issues where the tracks need to be sanded to fit over the idlers, this is straightforward. Fit isn’t perfect, but it’s probably close enough. I like this method of building the track/running gear assemblies separately and it does make track construction simpler, though I do feel that the tracks here are perhaps a little too thick.

However, the at least tracks here are thinner than those on the one-piece track/running gear assemblies, and I think that probably makes it worth going for this option.

I mount the track assemblies on the hull and they fit with no problems at all.

Then, I complete hull construction other than for the tow cables and jack which I will add when main painting is done.

Next, the turret, Basic construction is fine (other than for the need to drill out 14 holes…) and fit is pretty good. The turret on the Tiger tank was asymmetric, and that’s something that’s depicted on many recent Tiger kits, but not here…

The turret is completed and that’s construction pretty much finished.

Everything gets a base coat and a two-colour camo scheme. Yes, I know, it’s not my finest paint job, but I’m struggling to muster much enthusiasm for this build!

I paint the moulded-in-place tools and add the tow cables, jack and spare track links on the turret (though I lost one of the spare track links to the carpet monster) before adding decals, though I go for generic markings out of the spares box rather than using the supplied decals because this is the wrong model of Tiger for that used by Michael Wittman in 1944.

I add a coat of varnish and a brown oil wash to tone down the camo scheme, highlight shadows and to bring out things like the rear deck grilles and that’s this Airfix Tiger done.

After Action Report

Look: this isn’t a wholly terrible kit, OK? But it isn’t a particularly good one either. The principal problems concern overall inaccuracy and generally soft detail, but at least construction is fairly straightforward. I did consider attempting to correct some of the major accuracy issues here, but that isn’t easy. The incorrect placement of the side-skirts, for example, makes the hull side view and the general “sit” of the finished model look wrong. But these are moulded as part of the hull sides so, if you want to correct this, you’ll have to cut off the existing side skirts and build your own to replace them in the correct position.    

Then, you’ll want to sand off and replace the driver and gunner hatches with something closer to the correct size and to replace the gun mount with something that’s straight and not tapered. You’ll probably also want to replace the tow cables with something closer to scale and including detail, to thin out things like the exhaust shields, and to sand off and replace the not terribly convincing moulded-in-place tools. And if you do all that, you’ll still have a Tiger tank with a turret that’s incorrectly symmetrical and I can’t think of any way of fixing that problem. It’s difficult to escape the conclusion that you’d be better off simply buying a better 1/72 Tiger kit in the first place.

Perhaps this might work as a kit for an inexperienced modeller, particularly if they used the one-piece track/running gear assemblies. But they would still be faced with the need to drill a plethora of tiny holes. When Airfix first announced that they were bringing out a new range of 1/72 armour and vehicle kits, I was irrationally excited and I hoped that this might herald the beginning of a whole new range of Airfix small-scale armour that was as good as their recent 1/72 aircraft releases. That didn’t prove to be the case and to date, only this Tiger and the Sherman Firefly have been released. Having looked at this one in detail, I can’t say that I’m too disappointed about the lack of subsequent 1/72 Airfix armour kits.

Come on Airfix, I know that you can do better than this!

Related Posts

Airfix 1/72 Tiger I (A02342) In-Box Review and History

Airfix 1/72 Sherman Firefly Vc (A02341) Build Review

Airfix 1/76 Tiger I (A01308V) Build Review

Revell 1/72 Pz.Kpfw.VI Ausf. H Tiger (03262) Build Review

Italeri 1/72 T-34/76 Model 1942 (7008) Build Review

I begin by looking at one of the main problems here – the main gun. It’s a little too short, too tapered and the tip is wider than the barrel. So, I decided to replace it with a suitable length of sprue, sanded to give it a slight taper and drilled out at the muzzle.

I decide to continue with turret construction. And the age of this kit rapidly becomes apparent. A fair amount of sanding and filling is needed to get the main parts of the turret together (the turret halves, for example, don’t align well) and looking reasonable. There is also a noticeable sink hole on the front left side of the turret that needs to be filled.

I finish main construction of the turret and add some rough texture to the sides. Construction may be fiddlier than some recent kits, but at least you do end up with something here that looks like a T-34 Model 1942 turret. You’ll also see that I have closed the main turret hatch. I’m planning mounting the finished kit on a diorama base and adding some figures, and I had originally intended to use the figure supplied in the turret with the hatch open, but there are two problems. First is the lack of internal detail on the hatch, though I’m sure it would be possible to scratch build something appropriate. The other problem is more fundamental – the turret opening for this large hatch is so big that, even with the commander in place, the lack of internal detail is painfully obvious. So I have decided to have the turret hatch closed and to use the provided figure as a driver because the driver’s visor is not only a separate part that can be shown open, it includes good internal detail. 

Next, I work on the lower hull. This comprises just four parts, and it takes a bit of juggling to get everything lined-up. You’ll also want to sand down three fairly obvious sink-marks on either hull side.

Next, I address another minor issue. The idlers on early T-34s (including the Model 1942) had a distinctive large domed centre. You can see what I mean in the image below.

Here, they’re flat but with an indented part in the centre (it looks like a moulding issue). I use a piece of shaped sprue to replicate the dome. You can see one idler before and one after below.

Otherwise, the roadwheels and sprockets look fine, other than for the missing boltheads on each roadwheel (there should be 16 bolts on each), and I can’t think of any easy way to add those.

I then paint the running gear and attach everything to the lower hull. The roadwheels and idlers fit without problems, but the sprockets just don’t fit at all – the post on the sprockets is too large to fit in the socket on the hull. It takes a lot of sanding to get them in place and while wrestling them into position I manage to snap off both outer faces. I think I’ll leave these off until I get the tracks in position.

Next, the tracks. The detail on the outside isn’t bad, though the internal guide horns are rather small – on the T-34, rather than a conventional toothed sprocket, these large guide horns engaged with horizontal bars inside the sprocket. However, there really isn’t any easy way to deal with this, so I’ll probably just have to live with it. It also soon becomes apparent that these aren’t the same as more modern link-and-length tracks. The lengths just don’t engage with each other positively or particularly well and that’s a problem when you’re assembling the runs of individual links at front and rear. You can end up with runs that look plausible and equally spaced, but it takes more time and care than any other similar tracks I have experience with just to get the links approximately lined-up. It took more time than you’d probably guess just to get to this point.

It’s a little ironic that my last build, a Revell T-55, had some of the easiest to assemble link-and-length tracks I have ever come across while this has some of the most challenging. After quite a bit of work, the upper and lower track runs are done and ready for painting.

Once painted ,I fit the tracks and, despite the issues in building them, I don’t think the finished result looks too bad.

The last job on the lower hull is to add a small plastic card platform onto which I mount the half commander figure who will serve here as a driver and who will be hopefully be visible through the open visor.

Now for the upper hull. The first job is to add the handrails that were welded to the hull – there should be three on the left, two on the right and two smaller handrails on the glacis plate. These aren’t included here, though oddly their mounting positions are marked. You can see those on the left side of the hull arrowed below.

I make some handrails out of thin wire, though they’re probably still a little thick.

Then I complete construction of the upper hull except for the tools, tow cables, and stowage items. You’ll also see that I have left off the rectangular rear fuel tanks – as I noted in the in-box review, I don’t think you’d see both types on a single tank.

And then I join the upper and lower hulls. A little filler is needed under the nose of the front hull to cover a small gap, but otherwise, fit is fine.

Next, everything gets several thinned coats of green and I add the red star decals to the turret.

Then I give everything a coat of varnish and a grey oil wash, with darker oil paint used as a wash to highlight the grills on the rear deck.

Now, it’s time for something completely different. I want to show this tank in a winter whitewash scheme. Looking at wartime images, these were typically roughly applied and partly washed away by rain and snow. After some experimentation, I have decided to use artist’s pastils to try to replicate the effect of a tank with the last, streaky remnants of whitewash camo. Here’s the result.

I then add the tools, tow cables and stowage items and construction is done. This just isn’t as simple as many modern kits, but I quite like the way the finished model looks.

Now, it’s time to work on a suitably snowy, muddy diorama base. I use the same circular wooden base that I used for a recent Revell T-55 and begin with the mud, using a layer of filler bonded to the base with PVA glue.

Then I add some icing-sugar snow over a layer of PVA glue.

I paint the tank-rider figure supplied with the kit and add some of the HaT Soviet Tank Riders I bought for the T-55 diorama. The HaT figures aren’t the most sharply sculpted, but at least they’re provided in some interesting poses and they have appropriate uniforms and equipment.

I then add some mud to the tank tracks and on the base (using a mix of coffee grounds, brown acrylic paint and PVA glue) and put the figures on the tank (though I end up only using three of them) and place the tank on the diorama base.

After Action Report

There is no way round it, fit here just isn’t as good here as you’ll find on more modern kits. Many parts don’t align perfectly (including the track links) and you need to be prepared for some sanding and filling to end up with something that looks plausible. You’ll also be dealing with flash, moulding seams, visible sink marks and rather thick sprue attachment points that mean you’ll have to be very careful not to damage parts when cutting them off the sprues. All these things are probably unsurprising given the age of this kit.

You might assume that those things mean that this is a lousy kit. But, here’s the thing: I really enjoyed this build. If you’re willing to put in a little effort then, hidden beneath the limitations and imperfections of early 1970s plastic moulding technology, you’ll find a decent small-scale representation of the T-34 Model 1942. This won’t produce an award-winning model straight out of the box: it will take some work just to end up with a half-decent finished result, but I feel that it’s worth the effort.

This kit took me back to my early days of model building, when kits provided the basis for further work rather than a fully detailed finished article. In that sense it’s very different to a more modern kit. Working on this kit directly after the Revell T-55 highlighted just how far we have come since 1976 in terms of fit and moulding quality. But I did end up with what I wanted: dioramas showing two generations of Soviet medium tanks separated by 20 years (1940 for the T-34 and 1959 for the T-55) using kits separated by 40 years (1976 for this one and 2016 for the Revell T-55).

It’s no surprise that the Revell kit was better in almost every way, but this old ESCI kit surprised me in that while it might not be a perfect example of kit manufacturing, it does build into a respectable T-34 Model 1942. If you do want to build this model of T-34, and if you’re prepared to put in a little work, I think you could do a lot worse.  

Related Posts

Italeri 1/72 T-34/76 Model 1942 (7008) In-Box Review and History

Revell 1/72 T-55A/AM Build Review

Italeri (ESCI) 1/72 T-34/76 Model 1942 (7008) In-Box Review and History

It’s time for a review of an Italeri kit, except, though it may say Italeri on the box, this is actually an ESCI kit first released all the way back in 1976. Back then, Italian company ESCI (Ente Scambi Coloniali Internazionali) were producing some of the best 1/72 armour kits on the market.

These kits were accurate, nicely detailed and later versions even included link-and-length tracks which was a notable advantage over the vinyl tracks featured on most contemporary small-scale tank kits. It’s hard to imagine now, but at that time there just weren’t many 1/72 armour kits around – Hasegawa was one of the few other companies offering these and when this kit was first released, it was the only T-34 available in 1/72. In the 1980s ESCI went through financial problems and several periods of cooperation with other companies, including Aurora and ERTL, and some ESCI kits were re-boxed by Revell in the early 1980s.

ESCI no longer exists, but Italeri now owns the rights to former ESCI kits and has been re-releasing these since around 2001. When it was first released in 1976, this T-34 was regarded as a great kit. But it’s now approaching 50 years of age. Is it still any good? We’ll take a look in a moment, but first let’s take a very brief look at the history of the T-34.

History

In the late 1930s, the Soviet Union had two main tanks: the T-26, a relatively slow tank designed for infantry support and the much faster BT series of cavalry tanks. These were perfectly reasonable tanks, but both types were relatively lightly armoured and armed. Then, work began on the design of a new Universal Tank that would replace both types as well as the disappointing T-28 Heavy Tank.

An abandoned T-34 Model 1940, with a spare transmission lashed to the rear deck.

The outcome was designated the T-34 and this was a truly radical concept that would influence tank design for decades to come. Its frontal armour was steeply sloped, improving protection against anti-tank weapons. It’s Christie-type suspension, wide tracks and reliable diesel engine gave it excellent manoeuvrability even over muddy or snowy terrain. Its 76mm main gun was the equal of that fitted to any other tank of the early-war period, and better than many.

A column of T-34s. Closest to the camera is a T-34 Model 1941 or 1942 with a single, large turret hatch. Immediately behind is a Model 1943 with taller hexagonal turret and twin hatches.

The first production version (now identified as the Model 1940) was introduced into service in 1940, but it was rapidly replaced by an improved version, the Model 1941, that provided more firepower in the form of a longer and more powerful  F-34 76.2 mm gun. The Model 1942 retained this gun in the same two-man turret but added extra armour and new tracks. The Model 1943 introduced a new, larger (but still two-man), hexagonal turret with two hatches (all previous versions had a single, large hatch) and in some later examples and for the first time, a commander’s cupola. In 1944, this was replaced by the T-34-85, with a new three-man turret and a  ZiS-S-53 85 mm main gun.

A group of T-34 Model 1942s. Rubber shortages meant that many tanks were seen with a mix of steel and rubber-tyred roadwheels. The tank closest to the camera has rubber-tyred roadwheels at front and back with three steel roadwheels in between

Today, versions of the T-34 armed with a 76mm main gun are generally referred to as the T-34/76, though this designation was never used in the Soviet Union. There, all 76mm versions were simply identified as the T-34, and those with the 85mm main gun as the T-34-85. The version depicted in this kit is a T-34 Model 1942, with original turret, single large turret hatch and rubber-tyred roadwheels.

What’s in the Box?

Inside the end-opening box you’ll find just three sprues, with two moulded in dark green plastic and one (the tracks) in silver-grey.

There is some flash and a few visible sink marks, but the level of surface detail is generally very good, particularly considering the age of this kit.

The roadwheels and tyres aren’t bad, though they lack bolt heads.

Two figures are included, the top half of a commander and a tank rider. They seem to be adequately detailed for this scale but though the main turret hatch is a separate part, it lacks internal detail. You may want to add some if you’re going to have the commander in position.

Attention to detail is very good in some places. The light metal cylindrical fuel tanks, for example, have plausible dents and dings in them.

I have seen claims that this kit is actually a scaled-down version of the Tamiya 1/35 T-34, which was released the year before, in 1975. I have no idea if that’s true, but this one certainly shares an error with that Tamiya kit – it has two small additional towing points on the nose of the front hull (arrowed, below). These were never fitted to wartime T-34s and they aren’t shown on the Italeri box-art. These were apparently added to a T-34 in a museum after the war, and that was used as the basis for the Tamiya kit, and presumably this one too. You’ll want to remove these.

The only thing I’m not sure about here is the main gun. It looks a little short and rather tapered, while the original was closer to a straight tube, and the hollow end part (below the barrel in the image below) is wider than the main barrel, leaving an odd, wider band at the muzzle.

The instructions show how I think it’s supposed to look. To me, it just looks wrong, and this is one part of the kit that will probably need work.

The tracks have reasonable detail and look like a decent representation of the waffle-pattern originals.

Decals are provided for three tanks.

Three colour schemes are suggested, one in all-green, one in green with an unusual brown camo pattern and one in green with a whitewash winter camo scheme.  

Would You Want One?

Given its age, this really isn’t a bad kit at all. The mouldings are still sharp, surface detail looks good, and, with the exception of the main gun, a lack of detail inside the main hatch and the small extra tow points on the front of the hull, accuracy looks reasonable. Tools, tow cables and a couple of stowage items are provided and all are separate parts. It isn’t perfect – there is some flash here and some sink-marks that will be visible on the finished model and the attachment of parts to the sprues is fairly chunky compared to more modern kits. One thing to note is that this kit comes with two types of external fuel tanks: the cylindrical type and large rectangular tanks on the rear hull. Most wartime images of the Model 1942 don’t show it with external fuel tanks at all, but T-34s were upgraded in the field, so these might certainly have been added. However, it would have been very unusual to have both types fitted (which is what the instructions show) so you may choose to use one type or the other, or neither, but probably not both.

It’s fortunate that this was a decent kit because, when it was first released, it was the only 1/72 T-34 available (Fujimi, Matchbox and Airfix released kits of the T-34 before this one, but these were all in 1/76). Now, you’re spoiled for choice. Trumpeter released a T-34 Model 1942 in 2007, and this isn’t a bad kit, though it lacks tow cables and the pistol port on the rear of the turret that’s included here, and it has reasonably accurate but unglueable vinyl tracks.

The UM T-34 Model 1942 was released in 2003 and this is a decent kit that comes with PE parts and detailed link-and-length tracks, but it also has vinyl tow cables and tyres, which aren’t easy to paint. It does also feature an unusual turret, a pressed steel (not cast as the box claims) turret with twin hatches that looks similar to the later cast hexagonal turret seen on the T-34 Model 1943. This isn’t wrong – some T-34 Model 1942s with this turret were produced in one factory, but it does look a lot like a Model 1943 rather than a typical Model 1942.

The DML T-34 Model 1942 was released in 2005 and, like most kits by this manufacturer, is well detailed and comes with DS tracks (though these are said to be a little long). However, like the UM kit, it also features a pressed-steel hexagonal turret and it has a mix of steel and rubber-tyred roadwheels which makes it look more like a Model 1943 than a typical Model 1942. Of course, there are many alternative 1/72 kits of other models of the T-34 available, but overall, if you want to build a representative Model 1942 in 1/72, this elderly Italeri/ESCI effort still seems to hold up quite well.

Related Posts

Italeri (ESCI) 1/72 T-34/76 Model 1942 (7008) Build Review

Zvezda 1/72 Soviet Medium Tank T-34/76 Model 1943 (5001) In-Box Review and History

Revell 1/72 T-34/85 (03302) In-Box Review and History

Revell 1/72 T-55A/AM with KMT-6/EMT-5 (03328) Build Review

I begin by assembling the lower hull tub which comprises five parts. Fit is great.

I paint and add the roadwheels, idlers and sprockets. The roadwheels are a fairly loose fit on the spindles and some care is required to get everything to line up. On the T-55, its torsion-bar suspension means that the roadwheel arrangement is asymmetric, with the roadwheels on the left being set notably further back than those on the right. It’s good to see that accurately modelled here.   

Then I add the tracks. And I’d have to say that these are probably the simplest and most straightforward link-and-length tracks I have tried. Fit is good, they assemble precisely as per the instructions with no need to bodge or cut out links and when they’re done, they don’t look bad. Top marks to Revell! And I do appreciate the ability to completely finish and paint the running gear before starting work on the rest of the kit.

Then, it’s on to the upper hull. There are lots of parts to be added. A little filler is needed to smooth the join where the semi-circular fillets join the sides, but otherwise fit and location of the main parts is great.

Then I join the upper and lower hull and add the rear mudguards and the forward halves of the rear fuel tanks. Fit is great and no filler is required.

Next, the turret. There are some fairly tiny parts here, but everything locates well and fits nicely. I’m using parts appropriate for a Soviet T-55M here, as I did with the rear deck on the hull. The instructions don’t talk about these alternate parts at all (they only show the parts needed to build a T-55AM), but I was able to find an online scan of the instructions for the original Revell T-55M/AM kit, and these explain what’s needed and what should be left out.  

Then the hull and turret gets several thinned coats of green and some dry-brushed highlights. I have also added some colour variation to the base green, though it isn’t obvious in the image below.

Then I add decals from the spares box for a tank of 6th Guards Tank Division in 1975.

I add the turret MG, the tow cables and the unditching log and other parts on the rear hull and then I give everything a coat of varnish and a dark grey wash.

Normally, that would be the build close to finished but this time, I want to try to make a simple diorama base on which to display the finished kit. I want to include figures, both crew and infantry, and I was surprised at just how difficult it is to suitable Cold War figures in 1/72 and at a reasonable price. There are plenty of appropriate 3D printed and resin figures but most cost considerably more than I paid for this kit! In the end, I settled for two low-cost packs of figures. The infantry figures come from the Zvezda Soviet Motorized Infantry set, part of their Hot War wargames range and first released in 2013.

This is more like a mini-kit than traditional soft plastic 1/72 figures. It includes just five figures moulded in hard plastic with separate limbs and weapons.

The second set is HaT WW2 Russian Tank riders and this is a more traditional set of 44 soft plastic figures first released in 2011.

I want the seated infantry figures for my next kit, but this boxing also includes tank crew figures. These are World War Two figures wearing late-war tanker’s uniforms but in 1/72, IMHO, they’re close enough to pass for figures from the 1970s.

With the figures sorted, it’s time to consider the diorama base. OK, I know, you can buy lots of ready-made dioramas and display bases, but where’s the fun and challenge in that? I’m using a circular wooden kettle stand, purchased at my local Chinese Bazaar for a mighty €1.50.

The first step is to use filler to build up something that will hopefully look a little like a portion of dirt track passing through a grassy meadow in East Germany in the 1970s. Before adding the filler, I covered the top of the base with a layer of PVA glue to help bond it to the base.

Then it gets painted.

And finally I paint the edges of the base and add some of this stuff.

It’s easy to use – you just paint the areas where you want grass with PVA glue and then sprinkle it on and shake off the excess.

Then I add the tank and figures to the base and it’s done.

After Action Report

Producing kits that have sufficient detail but aren’t tricky to build can’t be easy. I certainly appreciate good detail, but I don’t enjoy a fiddly build. For me, these Revell 1/72 armour kits really get the balance right. They’re reasonably priced, mould quality is good, fit and location are excellent and detail is pretty good, but there’s nothing here in terms of construction that’s frustratingly difficult.  Just like the other Revell 1/72 kits I have tried; I enjoyed this build and I think it looks OK when it’s done.

Attempting a diorama base was fun. Just like the seascapes I have done; this was a different sort of challenge. It’s far from perfect (it would have been better, for example, if I had added some shrubs or bushes, just to give it more height variation), but I did learn from the experience and I’m planning another home-made diorama with my next armour kit.

I think that the figures add to the diorama. Although this is a relatively recent release, the HaT crew figures are old-fashioned soft plastic figures, and detail isn’t the best. The Zvezda hard-plastic figures are much better detailed and they assembled without any problems. Overall, I enjoyed this build. And that’s why my next kit will feature the T-55’s predecessor, the T-34 on another diorama base. But this time, I’ll be building a kit that’s almost 50 years old…

Related Posts

Revell 1/72 T-55A/AM with KMT-6/EMT-5 (03328) In-Box Review and history

Revell 1/72 PzKpfw IV Ausf. H (03184) Build Review

Revell 1/72 T-34/85 (03302) Build Review

Revell 1/72 T-55A/AM with KMT-6/EMT-5 (03328) In-Box Review and History

I have built several Revell 1/72 armour kits over the last couple of years and I really like them (you’ll find links to other reviews at the end of this article). They’re widely available for relatively little cash, adequately detailed, generally accurate and most include link-and-length tracks. So when I had a hankering for building a post-war tank, this Revell T-55 was the obvious choice.

This kit was first released in 2016 and then re-released with additional parts the following year. The version I’m reviewing here was released in 2020 and comprises the original kit plus the parts required to add the KMT-6/EMT-5 mine clearing equipment. All T-55s were provided with fittings for this additional equipment which could attached or removed as required.

Will this be as good as the other Revell 1/72 armour kits I have tried? Is it a good depiction of the iconic T-55? We’ll take a look inside the box in a moment but first, let’s take a brief look at the history of what is said to be the most-produced (and most destroyed in combat!) tank in the history of warfare…

History

Work on a successor to the T-34 began during World War Two and led to the T-44 Medium Tank, with improved armour and better performance due to lighter weight and a new engine. But the T-44 didn’t offer a notable advantage over the late-war T-34/85 and this tank wasn’t built in large numbers or ever used in combat. When the Soviet Union began post-war development of an entirely new Medium Tank, the designers started with the T-44.

The T-44

The new design was completed before the end of 1945 and it featured a low hull with a steeply angled glacis plate. Early versions had a similar turret to the T-44 but this was quickly replaced  with a rounded, cast turret similar to that fitted to the IS-3. Armed with a 100mm DT10 main gun, the new tank, identified as the T-54, entered service in 1948 and was, at the time, one of the most potent and effective tanks in the world.

A Czech T-54. One of the few obvious visual differences between this and the T-55 is the large ventilator hood on the turret roof, in front of the right-hand hatch. This ventilator wasn’t provided on the T-55.

Improvements were made to the T-54 during its long service life and these culminated in the T-55, introduced in 1959 and incorporating a number of refinements including the provision of a full NBC (Nuclear, Biological, Chemical) protection suite. Many existing T-54s were subsequently upgraded to T-55 spec., which is why this family of tanks is often referred to as the T-54/55.

A Polish T-55AM with rubber side-skirts and additional armour on the turret cheeks

Like its predecessor the T-34, the T-54/55 was a rugged, effective and relatively unsophisticated design, but it was also cheap to produce. That’s why so many were built (estimates vary from 20,000 – 60,000) and why it was used not just by the Soviet Union and other Warsaw Pact nations but was also purchased by the armed forces of many other countries looking for a low-cost but effective Main Battle Tank. As a result, the T-55 has seen combat in the Balkans, the Middle-East, Africa, SE Asia and in the Persian Gulf and remains in service with many armies around the world.

A North Vietnamese T-54 during the fall of Saigon in 1975

The T-55 was built not just in the Soviet Union but in other locations including Czechoslovakia and Poland (and a licence-built version, the Type 59, was also built in China). Tanks built in different locations had detail differences and the T-55 was subject to almost continual upgrades during its long service life meaning that there are a bewildering number of variants and models. The versions depicted in this kit, the T-55M/AM, were produced in the 1970s and 1980s and involved several upgrades to armour, fire control systems and to the engine with the T-55M being an upgrade to the original T-55 and the T-55AM being an upgrade to the subsequent T-55A.  

What’s in the Box?

The parts here are provided on six sprues moulded in grey plastic.

The roadwheels look to be accurate and sharply moulded with a rough casting texture on the outer set.

The link-and-length tracks also seem to be adequately detailed, inside and out.

Small parts such as the tow cable and cupola-mounted machine gun are sharply moulded, in-scale and have reasonable detail. All the hull and turret hatches are provided as separate parts and the turret hatches have internal detail, but no figures are provided, which seems like a missed opportunity.

No slide moulding seems to have been used here, but the tip of the main gun is a separate part that is moulded open, so you won’t need to drill it out. One thing that’s a little disappointing is that the turret is completely smooth, with no hint of the sort of rough casting texture provided on the hull sides and roadwheels.

The instructions don’t mention it, but there are also a number of optional parts provided here. For example, there are two alternate glacis plates, both with angled mudguards, one with and one without the mounting for the KMT-6/EMT-5 mine clearing equipment. So, you could build this as a T-55AM with or without the mine clearing stuff.

However, there is also a third alternative glacis plate, with straight mudguards and a number of other optional parts (hatches, turret tops, and rear deck parts) that mean you can also model this as a T-55M. Below – T-55AM turret top (left) and T-55M turret top (right).

Decals are provided for just two tanks, both T-55AMs of the East German Army.

Suggested colour schemes, as you’d guess for a Warsaw Pact tank, are all-green.

Would You Want One?

People who know far more about the T-55 than I ever will claim that this kit represents a Czech-built T-55 (which would not have been used in Soviet service), that the turret shape isn’t quite right and that the tracks are appropriate only for the AM version. Thus the markings provided for East German T-55AMs here make sense. But I’d like to build this as a Soviet T-55M without the mine-clearing equipment. Alternate parts are provided here that allow this, though I’ll have to accept that the tracks aren’t entirely correct and that the turret also isn’t spot-on. However, the differences and issues look relatively minor to me and I think I can live with them. I’ll also have to find suitable decals for a Soviet tank.

If you want to build this straight out of the box as an East German T-55AM with or without the mine-clearing gear, it’s reasonably accurate, though most references suggest that the AM version was generally provided with rubber side-skirts that aren’t included here and the light guards and turret rails are a little over-scale. So, this isn’t a bad effort at producing a 1/72 T-55M/AM, though it isn’t perfect. If you don’t fancy this one, then there are options in 1/72, though not as many as you might expect for such a widely-used tank.

Italeri offer a T-55A (7081) in 1/72, and this is a new-tool kit released in 2020. It looks pretty good in terms of accuracy and detail and includes hard plastic tracks and a detailed engine with openable engine covers. Trumpeter released a 1/72 T-55 M1958 in 2008 and it isn’t bad, though some of the detail on things like the roadwheels and the rear deck doesn’t look quite right, it lacks some detail (it doesn’t include light guards or tow cables, for example) and it comes with nicely detailed but unglueable vinyl rubber-band-style tracks.

British company Plastic Soldier Company did produce a kit of the T-55, though I’m not sure it’s still available. These were quick-build models intended for wargaming (three were included in each pack) and while they weren’t bad, they didn’t include a great deal of detail particularly in terms of the tracks and running gear. And that, as far as I know, is the lot if you want to build a 1/72 T-55.

Related Posts

Revell 1/72 T-55A/AM with KMT-6/EMT-5 (03328) Build Review – coming soon

Revell 1/72 PzKpfw IV Ausf. H (03184) In-Box Review and History

Revell 1/72 T-34/85 (03302) In-Box Review and History

Tamiya 1/35 Schwimmwagen Type 166 (35224) Build Review

I begin the build with the engine compartment. This is basically a separate section that drops into place in the rear hull and I want to see how it looks – if it’s OK, I’ll leave the rear access hatch open. If not. it will be closed. After building and painting, I think it looks OK – there are relatively few parts here, but they’re sharply moulded and seem to provide a reasonable representation of the Schwimmwagen engine, so I’ll be leaving the engine compartment hatch open.

I continue as per the instructions by adding the suspension and drive to the lower hull.

I then add the completed engine and interior into the lower hull.

I then start work on the upper hull, and that involves glueing pieces of plastic mesh to curved parts of the bodywork. The instructions do include templates for the mesh, which is helpful and there’s plenty of spare mesh if you do get it wrong. I used superglue and, as usual, I found it remarkably easy to glue my fingers to the bits of mesh, to the plastic parts and to each other but fiendishly difficult to get the small bits of mesh fixed in approximately the right place.

The rest of construction of the upper hull is less stressful and doesn’t involve gluing myself to items of furniture or to my cat. I then join the upper and lower hull. Fit is great and the joint between the upper and lower halves follows the ridge along the side of the vehicle, so it’s completely hidden. Just as in the Kubelwagen though, a decal for the tiny speedometer would have been helpful.

Next, I add some parts to the hull and then I give it several thinned coats of Dark Sand.

Then, I give it all a two-tone camo scheme and add some dry-brushed highlights and some light chipping.

Then, I add the decals and the wheels and give it all a coat of varnish and a dark brown oil wash.

Then, I add the remaining bits and pieces to the hull.

And that’s pretty much the construction of this Tamiya Schwimmwagen done. It’s all straightforward, there is virtually no flash and fit is generally great – no filler was used here at all. The only part that isn’t in place yet is the steering wheel – you have to leave that off until the driver is in position, and I work on him next.

The figure seems reasonably sculpted, assembles easily and fits in position, though I can’t help but feel that a soft cap rather than a steel helmet might have been a nice option – he looks pretty relaxed. I paint the figure, place him in position, add the steering wheel and a dusting of pastels and that’s this Schwimmwagen done.

After Action Report

Just like the Tamiya Kubelwagen I did recently, this was a simple, straightforward build and I feel that it builds into a decent representation of the Schwimmwagen. OK, there are probably small items you could add, and some stowage items would make it look even better, but what you get here is pretty decent.

There really isn’t anything challenging here in terms of construction and you end up with something that, IMHO, looks pretty much like the original. It has enough detail to be convincing but comes without the tiny parts that can make the build (for me at least) frustrating.

I like the fact that the engine is provided here, unlike the Kubelwagen kit, though, just like in that kit, a decal for the speedometer would have been nice and additional stowage items would have helped to make the interior look busy. Despite those minor issues, if you want to build a 1/35 Schwimmwagen, I can heartily recommend this one. Just don’t be tempted to take it in the bath to see if it floats…

Related Posts

Tamiya 1/35 Schwimmwagen Type 166 (35224) In-Box Review and History

Tamiya 1/35 German Kübelwagen Type 82 (35213) Build Review

Tamiya 1/35 Schwimmwagen Type 166 (35224) In-Box Review and History

I recently built a Tamiya Kubelwagen, and it was a thoroughly enjoyable experience – a simple, quick build with great fit and it ended up looking reasonable. So I thought I’d give the Kubelwagen’s amphibious cousin from Tamiya a try: the Type 166 Schwimmwagen.

Just like the Kubelwagen, Tamiya first released a 1/35 Schwimmwagen all the way back in 1970 (it was the third in the Military Miniatures series) and, to be honest, it wasn’t great in terms of either accuracy or detail. But then, in 1998, one year after the new Kubelwagen, they released this new Schwimmwagen kit and the word is that it’s pretty decent.

One of the things I like about these older Tamiya kits, in addition to great fit and clean mouldings, is that they’re now available for very little cash. This one cost me just €15, less than you’d pay for most contemporary 1/72 scale kits. So it’s certainly cheap, but is it any good?

History

Like the Kubelwagen the Schwimmwagen was produced by VW, but about the only thing these two vehicles share is the same flat-four, air cooled engine. The need for a light amphibious vehicle had become apparent to the Wehrmacht before the beginning of World War Two and VW began to investigate of producing a vehicle similar to the Kubelwagen but with amphibious capability.

A Type 128 Schwimmwagen

The first effort was the Type 128, based on a modified Kubelwagen chassis but featuring a welded tub hull. Around 100 were produced, but these weren’t a great success – the hull proved prone to cracking if the vehicle if it was used off-road which obviously wasn’t ideal in a vehicle designed to float. This led to the development of a new version with better torsional rigidity and a shorter wheelbase (40cm shorter than the Kubelwagen) which became the Type 166.

A Type 166 Schwimmwagen on the eastern front

This was much more robust and over 15,000 would be built in total from 1941 until virtually the end of the war. The Schwimmwagen featured four wheel drive (in 1st gear only) and a small propellor, driven directly from the transmission that could be folded down for use in water. There was no steering in water other than using the front wheels as rudimentary rudders and an oar was provided as standard equipment with the Schwimmwagen to aid in steering.

A group of Schwimmwagen demonstrate their amphibious capabilities

Just like the Kubelwagen, the Schwimmwagen was reliable and rugged, easy to maintain and had great off-road (and amphibious…) capability. Officially, this was the Type 166 Schwimmwagen (Floating Car), but to most of the troops who used it, this was known as the Frosche (frog). This versatile vehicle was used as a recon vehicle, staff car and command car on virtually every theatre in which German troops were engaged from 1941 including, apparently, North Africa and Tunisia, though I don’t suppose it did much schwimming there….      

A Schwimmwagen on the eastern front shows off its off-road capability

What’s in the Box?

Inside the usual Tamiya top-opening box you’ll find two sprues and the hull moulded in light brown plastic, a transparent die-cut plastic windscreen, a square of black plastic mesh (for making the intake screens), decals and instructions.

Detail seem to be standard for Tamiya its, i.e., crisp, sharp mouldings, no flash at all and though there are a few ejector marks, they all seem to be placed where they won’t be seen on the finished model.

Here, unlike the Tamiya Kubelwagen, you get a complete engine and ancillaries and an engine compartment cover that is a separate part and can be shown open– hurrah!

The wheels and tyres are moulded as single parts but look adequately detailed.

The floor slats have suitable wood texture.

The figure looks sharply moulded.

Even the sporty-looking seats seem nicely modelled.

Decals are provided for five vehicles, all from the Wehrmacht.

A sixth set of decals, for a vehicle from Schwere SS-Panzerabteilung 101 in Normandy in 1944 is mentioned in the instructions, but they aren’t included – they seem to have been cut off the decal sheet. I presume that the SS runes (which appear on the numberplates for that vehicle) are now also proscribed symbols. Suitable colour schemes are shown on the instructions and on the box sides.

Would You Want One?

Like most Tamiya kits I have seen, this looks great in the box. It may be more than 25 years old but all the mouldings are as sharp and clean as many more recent kits. OK, it looks rather like a bathtub on wheels and there could be more detail and stowage itesm (though several PE and detail sets are available for this kit) but to me, this looks like a decent kit of the Schwimmwagen. If you do fancy something different, there are, as far as I know, just three alternatives in 1/35.

The Italeri Schwimmwagen was released in 1977 and despite its age, it isn’t bad at all. It comes with a hood that can be shown up (the Tamiya version only has the hood folded), three figures (including a civilian woman) and a bicycle with not terribly convincing spokes.  The AFV Club Schwimmwagen covers the earlier and less common Type 128. This kit was released in 2013 and it’s pretty good, with lots of detail, PE parts and vinyl tyres though it doesn’t include an engine.  

The most recent 1/35 kit of this vehicle comes from Hero Hobby and it was released in 2016. Just like their Kubelwagen, it isn’t bad, but the mouldings just don’t seem to be quite as sharp as those offered by Tamiya. If you fancy a 1/35 Schwimmwagen with reasonable detail, this 1998 Tamiya offering still seems to be a reasonable choice. And if you want one with an engine, this is probably the kit to go for!

Related Posts

Tamiya 1/35 Schwimmwagen Type 166 (35224) Build Review – coming soon

Tamiya 1/35 German Kübelwagen Type 82 (35213) In-Box Review and History

Airfix 1/72 Tiger I (A02342) In-Box Review and History

This was the second Airfix 1/72 tank kit, released in 2021, one year after the Sherman Firefly. To date, these remain the only new AIrfix 1/72 AFV kits – when these were announced in 2020, Airfix also noted that they would be producing 1/72 kits of the Scammell Pioneer Recovery Tractor and Scammell R100 Artillery Tractor, though those now seem to have been dropped.

Like the Sherman Vc, this is available both as a stand-alone kit and as part of a Classic Conflict set that also includes the Firefly as well as some small pots of Humbrol paint, brushes and glue.

I have this Classic Conflict set and I have already built the Sherman Vc. I rather enjoyed that build – it was simple and, while it may not be the most detailed kit, it does at least end up looking like a Firefly. Having looked inside the box, I’m not at all sure you can say the same about this new 1/72 Tiger. In fact, I think this may be the most disappointing kit I have encountered since I got back into kit-building…

History

I’ll keep this short, because I have already covered the history of this tank in other reviews (you’ll find links at the end of this one) and because the history of the Tiger I is well-known. One thing that was notable was that there were a great many variants – this tank was modified and improved throughout its production history that ran from August 1942 – August 1944 to such an extent that there were barely more than a handful of Tigers that were completely identical.

An Early Production Tiger

However, in general, this tank is divided into three main types. After some early examples, the first main production type is known as the Early Production version (also known as the Ausf. H), recognisable by having rubber-tyred roadwheels, a tall, drum-shaped commander’s cupola and a complex air filtration system on the rear deck.

A Mid Production Tiger with zimmerit

The next main version was the Ausf. E, also known as the Mid Production version, that still featured rubber-tyred roadwheels, but had a lower cupola and a simpler air filtration system that left a clean rear deck. The Late Production version (still called the Ausf. E) had the lower cupola and a clean rear deck, but used steel roadwheels without rubber tyres. However, these aren’t hard and fast distinctions, and some Tigers show features of different models.

A knocked-out Late Production Tiger

This Airfix Kit is identified in the instructions as an Ausf. E, and it seems to be a Mid-Production version with rubber-tyred roadwheels. However, all but a handful of Mid-Production Tigers were given the zimmerit anti-magnetic coating, and that isn’t featured here.    

What’s in the Box?

Inside the box you’ll find five sprues moulded in mid-brown plastic.

Surface detail really isn’t great anywhere. Take a look at the right-hand turret hatch and the rear mudguards below. They aren’t completely wrong, but they certainly don’t look great either.

The tow cables are separate parts, which is good. But unlike every other kit I have seen that models such parts, there is no attempt here at a texture that suggests that these are steel cables – they’re just smooth plastic tubes that are much too thick and with no detail at all. Sadly, the result is that these look more like pieces of overcooked spaghetti than tow cables.

Many parts are way too thick. The front mudguards and exhaust heat shields (below), for example, were in real life made from fairly thin sheet steel. They’re over 1mm here, which scales up to almost 3” thick!

Just like the new Sherman Vc, two options for completing the tracks are provided here. Two parts that comprise the complete running gear and tracks can be used on either side, though the tracks using this option are very thick indeed.

Or you can go for conventional link-and-length tracks with separate running gear. The tracks have some detail on the outside (though they are far from convincing) , but lack any detail on the inside at all.  

In the Classic Combat set, only one set of decals is provided, for what is claimed to be the tank of Michael Wittman in June 1944. But, wartime images show clearly that Tiger 007 was a Late Production Tiger with steel wheels and zimmerit (not the version depicted here). Wittman only used this tank for a few days – he received it in early August and was killed in it on August 8th. His previous Tiger, turret number 205, which he used from in June and July 1944 would probably have made more sense in terms of an opponent for a Sherman Vc depicted in June 1944, but that too was a Late Production Tiger with zimmerit.  

A plausible paint scheme is suggested for Wittman’s tank.

(In)Accuracy

I’m not a rivet counter. But I do like my kits to at least look close to right. And this one has some notable problems that are evident as soon as you open the box. I spotted three main issues, beginning with the driver and radio operator hatches on the front hull. The problem is that they’re just much too small.

In real life, these distinctive circular hatches were 560mm diameter. Here, they’re just over 5mm in diameter, which scales to about 380mm – only about 60% of the correct size! To me, they just look silly – you can immediately see that a 1/72 figure couldn’t fit through, which tells you that something is very wrong. Look at the image below, which shows the front hull from the 1/72 Revell Tiger I Ausf. H (middle), and the old 1964 Airfix 1/76 Tiger (right), which provided these hatches as separate parts. Both have correctly sized hatches, but the new Airfix 1/72 front hull (left) has hatches that are obviously much too small.

The main gun support tube (the part closest to the mantlet) should be a thick, straight tube with a chamfered end. Here (left, below), it’s too thin and distinctly tapered which again, just looks wrong and nothing like the original. On the right below you’ll see the same part from the old 1/76 Airfix Tiger, which got this close to right.

Then there are the side skirts/track guards. On this kit, they are placed too low down on the hull side plates. You can see what I mean if you look at this image below from Airfix of the completed kit and a side view of the Tiger from the Bovington Tank Museum.

This is wrong – there should be a fair gap between the top of the tracks at the rear and the underside of the track guard. Something is amiss here – I suspect that the angle at which the track guards are fitted to the hull is wrong, with too steep a slope towards the rear and that they are also placed too low down on the hull sides. And the track guards are moulded as integral parts of the hull sides, so it isn’t just a case of re-positioning them. Sheesh – even the 1/76 Airfix Tiger from 1964 got the size and shape of the gun mount and hull hatches and the position of the track-guards (see below) correct, so how come this one doesn’t?

Let’s be clear: I am not an expert on the Tiger I. When I’m checking the accuracy of any kit, I do so by comparing photographs of the real thing with the kit parts. If they’re close, that’s generally good enough for me. But this doesn’t even seem to be close in the three areas noted above, and these are just the problems I have identified before I even start the build!

On the back of the Classic Conflict you’ll find this image. At first, I thought it was the completed kit, but it’s actually some sort of computer-generated picture. And it’s completely accurate, with a straight gun mount, appropriately-sized hull hatches and track guards in the right place. It’s a pity then that the kit inside the box doesn’t look anything like this…

These do seem to be errors rather than simplifications or moulding issues. In 2021, that’s more than a little surprising. The Tiger I isn’t exactly an obscure AFV and there is a great deal of reference material available, so you’d imagine that getting these fairly basic things right wouldn’t be difficult. And if you’re going to spend time and money designing, making moulds for and marketing a new kit, you’d assume that you’d also spend time on basic research. But it’s disappointing to note that Airfix do seem to have got some fundamental things wrong here.

Would You Want One?

As I said in my review of the Airfix 1/72 Sherman Vc, I still have positive and nostalgic feelings for Airfix and I really, really, wanted to love this new armour kit and to be able to recommend it unreservedly. But I can’t. There are just too many basic errors here to make this a good kit of the Tiger I and that, combined with generally soft mouldings, moulded-on tools, a lack of detail, over-thick parts and the fact that the decals provided are for a different model of the Tiger I makes it difficult to see why you would choose this instead of one of the many other, better, 1/72 Tiger I kits that are currently available.

Sorry Airfix, but this is a dismally disappointing attempt at a Tiger I on just about every level. In some ways, this is even less accurate than the 1964 1/76 Airfix Tiger I kit (that kit was missing some parts, such as the turret stowage and mudguards, but what was there was generally accurate)! This is one of the few kits where, having examined it in the box, I can’t say that I feel at all enthused at the prospect of building it, partly because I just can’t see any simple way of correcting the errors. Perhaps if you wanted a kit for an inexperienced modeler this might be a good choice because it does seem relatively simple (other than for the fact that you need to drill out more than 25 holes in the hull and turret for various mountings), but otherwise, you’re probably best going with something different.

And there is plenty of choice in 1/72. My personal favourite is the Revell Early Production Tiger I Ausf. H. It’s an accurate, extremely detailed kit and it and comes with very nice link-and-length tracks. Dragon do several models of the Tiger I and all appear to be reasonably detailed and accurate. What is claimed to be the best currently available Tiger I in this scale comes from Vespid Models, a Hong Kong company that has only been producing small scale armour kits for a few years. Their Tiger I was released in 2023, and it’s said to be outstandingly accurate and includes link-and-length tracks and PE parts. All these alternatives cost more than the Airfix kit, but I guess that in this case, you truly do get what you pay for.  

Related Posts

Airfix 1/72 Tiger I (A02342) Build Review – coming just soon as I can muster the enthusiasm…

Airfix 1/72 Sherman Firefly Vc (A02341) In-Box Review and History

Airfix 1/76 Tiger I (A01308V) In-Box Review and History

Revell 1/72 Pz.Kpfw.VI Ausf.H Tiger (03262) In-Box Review and History

Airfix 1/72 Sherman Firefly Vc (A02341) Build Review

I begin by assembling the lower hull, and all the parts locate positively and fit well.

Then, I add the suspension bogies, sprockets and idlers on each side. I’m planning to complete and paint the lower hull, tracks and running gear before I add the upper hull. I decide to use the Humbrol actylic paints supplied with the Classic Combat set, just to see how they are. And in general, the Olive Drab is fine and covers well, though perhaps it’s a little dark for a British tank. My only concern is that there really isn’t much paint in each pot – I hope I’ll have enough to finish!

Then I work on the tracks. I begin with the left-hand side. There are just six lengths of track, and these do assemble much more easily than standard link-and-length tracks. However, there is an odd problem – the track lengths are around half a link too long and I have to cut away part of the length that runs from the idler down to the bottom run to make it fit.

Then I do the right-hand side, and this assembles with no problem and no need for trimming – strange!

I rather like this approach to track assembly. It’s fairly easy and the result looks much better than vinyl tracks. Next, I work on the upper hull. Mine came with a small crack on the left-hand mudguard, though this is very small and easily filled.

Then I add the rear hull plate, having cut off the mudflaps and drilled the two locating holes for the rear stowage box.

Next, the lifting rings and headlights, and these too are a little different to usual. Each part is mounted on a small base, and all are installed in the upper hull from below.

When in place, they look fine. But it does seem odd that Airfix have decided not to include any of the turret lifting rings using the same system.

I then join the upper and lower hulls. Fit is good and no filler is required. Overall, hull construction is very straightforward (with the exception of the minor track issue on the left side) and no filler was required anywhere except to fix the cracked front mudguard.

Next, the turret and, with fewer than 10 parts, construction doesn’t take long. I drill out the sides of the muzzle brake and add some lifting rings from the spares box.

 The turret sits nicely on the hull. And that, apart from the stowage items and the shovel, is construction done. No problems and fit is really very good – the only place I used any filler at all was on the small crack on the front left mudguard.

Next, painting. Everything gets a coat of the olive drab supplied with this kit. And, despite my concern, there is more than enough paint to do the whole tank.

Then I paint the tools (which is tricky, because they’re tiny and the mouldings lack definition), add the shovel (which is a really strange shape) add the decals to the hull (and some of them just don’t want to come off the backing sheet – I cracked and damaged the “Belvedere” decal on the left side) and some dry-brushed highlights.

I then add a few stowage items and spare track links to the front hull, give everything a coat of varnish and then a light wash in dark grey oil to accentuate the shadows. With a final dusting of artist’s pastels to simulate mud and dirt, this Airfix Sherman Vc is done.

After Action Report

I thoroughly enjoyed this build. Construction was about as simple as it gets. There were no problems, nothing difficult, no tiny parts and fit was very good indeed.  I like the method of construction for the tracks provided here. It’s easier than link-and-length tracks and, IMHO, looks better than the one-piece option or most vinyl tracks. Overall, I think this turned-out OK.

This is a pretty good kit that would suit less experienced or beginner kit-builders and you could probably complete it to a reasonable standard using only the paints provided. The main problem here is that this is a crowded market and there are other 1/72 M4 kits out there that are way better than pretty good – the Heller M4A2, for example, is simply outstanding (although it has vinyl tracks that are rather short) and it costs around the same as this new Airfix kit. If you want to spend a little more, the Dragon Sherman Vc has more detail and sharper mouldings.

60 years of armour kit history. 2020 Airfix 1/72 Sherman Vc (left) and 1961 1/76 Sherman I (right).   

Perhaps Airfix are going back to their roots here, and providing a pocket-money-priced kit suitable for  modellers of all skill levels? If so, they are to be applauded and I certainly hope we’ll be seeing more, new Airfix 1/72 armour kits in future. If, like me, you value a simple build and you’re willing to accept detail that is less than 100% complete – go for this one. If you want absolute fidelity, you may want to look elsewhere.

Related Posts

Airfix 1/72 Sherman Firefly Vc (A02341) In-Box Review and History

And for a blast from the past:

Airfix 1/76 M4 Sherman Mk. I (A01303V) Build Review

To see why I rate the Heller M4A2 so highly:

Heller 1/72 M4A2 Sherman Division Leclerc (79894) Build Review