Tag Archives: gun

Tamiya 1/35 British Army 6 Pounder Anti-Tank Gun (35005) Build Review

I start by gluing together the two halves of the gun, as the instructions suggest. You’d think that would be pretty easy, wouldn’t you? That’s what I thought too… Fit between the two halves is, well, indifferent would probably be a kind way to put it. There are locating pins on one half and corresponding holes in the other, but the pins are smaller than the holes which gives you a lot of leeway to get it wrong. It took a fair bit of fiddling and securing the two halves together with pegs and tape until I got something that looked just about right.

Although everything lines up on top, the underside looks like this…

Even then, the join between the two halves is very apparent, especially on top – the seam there took a great deal of sanding. I also notice even though the various sections of the gun line up perfectly on top, they are out of alignment by about 1mm underneath. I suppose you won’t really see the join on the underside of the finished model, but still, that’s not right. Then I noticed that the end of the muzzle brake isn’t circular. I mean, it’s a long way from circular and the central opening is far from central.

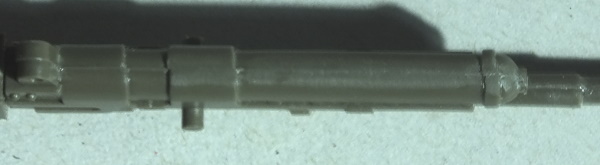
Peg on top of muzzle-brake

Then I noticed that the two halves of the muzzle brake are different. On the left side, the muzzle brake is a fairly smooth cone, which looks pretty much like photographs of the 6-Pdr. On the right side, there is a distinct lip at the muzzle end. There is also a strange peg on the top rear of the muzzle brake. It doesn’t seem to be a moulding defect and it’s present on both halves, but it isn’t shown on the instructions or the box-top art and I can’t see anything like it on any wartime photograph of this weapon. Sheesh – I have only glued two parts together and already it’s clear that a fair amount of sanding and filling will be required to get something that looks even close to correct.

Fortunately, the remainder of construction is easier, though there are still lots of moulding seams and defects that need to be sanded. I also added filler to hide the very large mounting holes in the front of the main gun shield. Fit is generally OK though it’s just not as good as later Taimya kits. The Panzer II I built, for example, was released in 1971, just one year later than this one, but it’s much, much better in terms of fit and overall sharpness of mouldings.

Finally, after a great deal of sanding, construction is complete. I don’t fix the forward shield in place to make life easier when I’m painting. One thing that’s notable is that the main gun shield really does look much too thick…

Anyway, on to painting. I start with a coat of Vallejo Russian Green, which (IMHO) isn’t a bad match for the Khaki Green used on British tanks and vehicles before they switched to Olive Drab in 1944. The tyres are finished in several shades of dark grey.

Then, I add highlights in a lightened version of the base colour and paint chipping and scratching using Vallejo German Grey in areas that would be likely to wear. I’m not going OTT here: I just want to suggest some general wear and tear.

Then, it gets a coat of clear matte varnish followed by an oil wash using Abteilung 502  Dark Mud (a dark grey) to emphasize shadows. As I’m doing this, I also notice that I have managed to assemble the main axle upside-down! No excuses – the instructions clearly show what’s needed, but I somehow still managed to get it wrong. Oh well, at least it’s easy to fix…

And at that point, the gun itself is pretty much done. This is a quick and straightforward build (assuming that you actually follow the instructions!) and painting really doesn’t take long at all. That is pretty satisfying but now it’s time to take a look at the figures.

Detail isn’t particularly good and is not well-defined, which will make painting more difficult. Trousers look OK, but the battledress blouses look much too tight and close fitting – in reality, these were made of thick material and often fitted rather loosely and looked quite bulky. These guys look as though they’re wearing skin-tight shirts! At least these figures are simple to assemble, though a little filler is needed here and there to cover minor gaps. There’s no doubt about it, they just aren’t up to current standards. And look at how those helmets are attached to the sprue – getting them off without damage is going to be a challenge.

I don’t plan to build a diorama here, but I will paint the figures – my figure-painting skills need as much practise as I can get and I want to see how they look when they’re done. I do a simple colour scheme for all three – Russian Uniform for blouse and trousers, khaki for belts, webbing and gaiters, grey for helmets and dark grey for boots. Once they’re painted, they get an oil wash in dark grey to bring out the shadows.

And here they are – the officer won’t stand unaided, so that’s why he is attached to a base and, I think I have assembled it correctly, but the loader’s pose does look kind of odd… And what they are wearing only approximately looks like the British Army uniform of World War Two.

And here is the crew with the gun:

After Action Report

You’ll know if you read the reviews on this site that I like older kits and that I have thoroughly enjoyed the other early Tamiya kits that I built (Panzer II, Walker Bulldog, etc.). This one, not so much. Look: this isn’t a terrible kit by any means – it’s a simple and undemanding build and the end result kinda, sorta looks like a 6-Pounder anti-tank gun with a British Army crew. But it is easily the least impressive Tamiya kit that I have ever come across. Honestly, it’s a bit crap in terms of detail and fit even when compared to other Tamiya kits from the early 70s.

When I bought this, I knew it was an early Tamiya kit, though I didn’t realise it was one of the very first of the Military Miniatures series. I guess that this kit represents Tamiya beginning to learn the business of making 1/35 kits so it probably isn’t surprising if quality doesn’t match their later efforts. That also makes it interesting if you know its history, but if you purchased this without knowing how old it was and simply on the basis of the Tamiya name on the box as an assurance of quality, I think you’d be understandably rather disappointed.

So, come on Tamiya, after more than 50 years, you must have made a handsome return on the original moulds for this kit. Isn’t it time that this was sent into honourable retirement and you gave us an improved version of this British anti-tank gun? At the moment, all I can say is that this  is probably one old Tamiya kit that’s best avoided.

Related Posts

Tamiya 1/35 British Army 6 Pounder Anti-Tank Gun (35005) In- Box Review

Tamiya 1/35 3.7cm Antitank Gun PaK 35/36 (35035) Build Review

Tamiya 1/35 Panzerkampfwagen II Ausf. F/G (MM109) Build Review

Tamiya 1/35 British Army 6 Pounder Anti-Tank Gun (35005) In-Box Review

It’s been a while since the last post because I have been taking a break from kit-building. However, I have an unbuilt kit that has been sitting on the shelf for several months. When I found myself between other projects, that seemed like a good opportunity to have a look at this venerable Tamiya kit.

This is another blast from the past, and a kit I recall seeing in my local shop during my kit building heyday back in the early 70s. It was one of the very first batch of seven kits that launched the Tamiya Military Miniatures series of 1/35 kits all the way back in 1970. These included British and German infantry, German and American tank crews, a Kübelwagen, a Schwimmwagen and this anti-tank gun and crew. Like many of those early Tamiya kits, this is now as cheap as chips – I found this one on special offer for under €10. But, it’s now over 50 years old!

Is this rather elderly kit worth your time, attention and cash or is it best ignored? Let’s take a look…   

History

The Ordnance Quick Firing (QF) 6-Pdr anti-tank gun was an interim design adopted by the British Army in May 1942 when the existing QF 2-Pdr proved to be ineffective when used against German tanks. Unlike the 2-Pdr which was fitted with a bulky tripod mount, this gun was provided with a two-wheel, split trail carriage. Early versions had a plain barrel but the most common version, the Mk. IV (which is modelled here), featured a longer barrel with muzzle brake.

British airborne troops with a 6-pdr gun in Hamminkeln, Germany, March 1945.

Image: WikiMedia Commons

The calibre of this weapon was 57mm and, unlike the 2-Pdr, both armour-piercing and high-explosive rounds were provided. This gun was first used in combat in North Africa where it quickly proved its worth against the German Panzer II, II and IV. In the Tunisian Campaign, QF 6-pdrs were even able to knock-out more than one German Tiger!

A British crew with an American 57mm M1 version of the 6-Pdr in the Western Desert, 1942.

Image: WikiMedia Commons

In Royal Artillery units, the QF 6-pdr was gradually replaced by the more powerful Ordnance Quick-Firing 17-pounder from early 1943. In British infantry units however, the QF 6-Pdr remained the only A/T weapon and was used in all theatres in the west for the remainder of World War Two and remained in service up to 1951.

A British Army 6-Pounder photographed near Nijmegen, Holland in October 1944.

Image: WikiMedia Commons

In early 1943, the QF 6-Pdr was also adopted by the US Army as the 57mm M1. This American version of the 6-Pdr was also exported to Russia under the lend/lease agreement. Versions of the 6-Pdr were also used as the main armament in several British tanks including the Churchill, Cromwell, Crusader and Valentine as well as in the Canadian Ram tank. 

A Valentine IX fitted with the QF 6-Pdr. This was one of a number of these tanks provided to the Red Army.

Image: WikiMedia Commons

What’s in the Box?

The box contains just two sprues moulded in olive green plastic.

One sprue contains the 30 parts that make up the gun itself.

Despite the age of these moulds, detail on the gun parts looks sharp and well-defined, the completed gun can traverse and elevate, the trail legs can open and close and the breech block can be shown open or closed.  

The other sprue contains the parts for the three figures and ancillary parts including ammunition boxes, shells and shell casings.

All the figures are wearing what appears to be P37 battle dress with trousers bloused into webbing gaiters over boots. Each is also provided with a Mk. II steel helmet. The detail on the figures is just about acceptable though it isn’t particularly well defined and the faces lack expression. A pistol holster is provided for the officer and a couple of Lee–Enfield rifles for the other ranks. There are no water canteens or other accessories for the figures.

Given the paucity of parts, the instructions are nice and simple with just six steps showing construction of the gun itself.  

The instructions include a short history of the 6-Pdr gun, photographs of the original and brief painting instructions which note that in desert service this weapon was painted Sand and otherwise was finished in Olive Drab. There are, as you’d guess, no decals provided with this kit.  

Would You Want One?                                                                                                   

If you go for this kit, you’ll have to accept that this is one of the very earliest Tamiya 1/35 kits and detail is fairly simplified even compared to kits they produced later in the 1970s: their PaK 35/36 from 1974, for example, is notably more detailed. Whether that’s a good or a bad thing depends on your point of view: this looks like a very straightforward build and what detail is provided is reasonably accurate though things like the sighting telescope are very rudimentary and both gun shields are way too thick.

The figures are also well short of current levels of detail, pose and expression. I have seen several other reviews that claim that the figures provided with this kit are completely worthless. I’m not sure I’d agree with that entirely and for me, a relatively simple kit and figures doesn’t represent a major problem. If there is one thing I have learned during the last couple of years of kit-building, it’s that I really hate faffing around with a bazillion tiny parts so I’m generally willing to accept a kit with less than stellar levels of detail in exchange for an easy build. That’s precisely what this appears to be.  

If you want to build a 6-pdr gun in 1/35 scale but you don’t fancy this one, there are several alternatives. Chinese manufacturer Riich Models offer several 1/35 6-pdr kits. These include RC35044, 6 Pounder Anti Tank Gun with British/Commonwealth Crew. This looks like a cracking kit with lots of detail, photo-etch parts and a nicely moulded, posed and detailed five-man crew.

Taiwanese manufacturer AFV Club offer several versions of the 6-Pdr in 1/35 including AF35217, British 6pdr QF Anti-tank Gun Mk.IV. These are very detailed kits and all feature very tiny parts – many of these kits are spread over six sprues and the parts count is almost 10 times that of the Tamiya offering. Some versions also include PE parts, turned brass barrels and shell casings and soft vinyl tyres. However, none include crew-members and these kits are comparatively expensive at anything up to €60. 

Russian manufacturer Zvezda offer kit 3518, British Anti-tank QF 6-PDR Mk II. However, this lacks any crew members and it’s actually a re-box of a Peerless-Max kit from the early 1970’s so detail just isn’t as good as you will find on more recent kits. Another Chinese manufacturer, Bronco Models (which I believe is associated with Riich Models or it may even be part of the same parent company) offer several versions of the 6-Pdr plus towing vehicles and crews including versions used by British airborne forces during World War Two such as CB35170, 6pdr and ¼ Ton Truck. These appear to be very detailed kits but they do include lots of tiny parts and PE.  

Related Posts

Tamiya 1/35 British Army 6 Pounder Anti-Tank Gun (35005) Build Review

Tamiya 1/35 3.7cm Antitank Gun PaK 35/36 (35035) Build Review